Yield: 10 Honey Buns
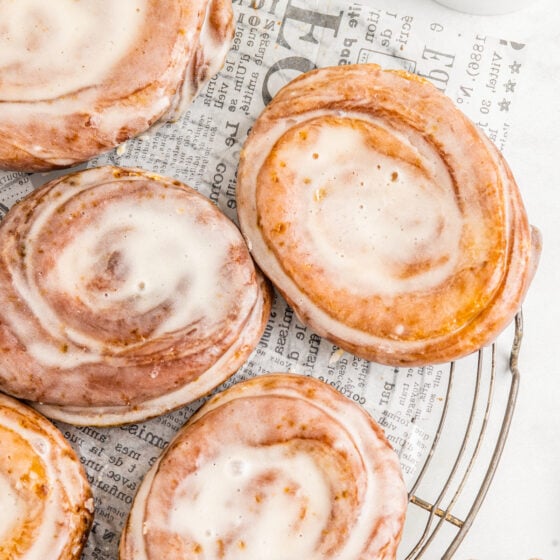
Homemade Honey Buns
These soft, sweet Homemade Honey Buns have the same melt-in-your-mouth texture that you love from store-bought honey buns! Sticky and sweet with a cinnamon sugar filling, and creamy homemade glaze.
Ingredients
For the Dough:
- 3 cups all-purpose flour, plus more for rolling
- 3 tablespoons granulated sugar
- 1 tablespoon instant yeast
- ½ teaspoon salt
- ½ cup warm water, between 105°F-115°F
- ⅓ cup honey
- 1 large egg
- 1 teaspoon vanilla extract
- ¼ cup shortening, melted
- Vegetable or peanut oil, for frying
For the Cinnamon Sugar:
- ¼ cup granulated sugar
- 1 ½ teaspoon cinnamon
For the Glaze:
- 4 ⅔ cup powdered sugar
- 2 ½ tablespoons honey
- 1 tablespoon melted butter
- ½ teaspoon vanilla extract
- ¼ teaspoon salt
- Warm water, as needed
Want to save this recipe?
Instructions
- Whisk together the flour, sugar, yeast, and salt. Set aside.
- In a medium sized bowl, whisk to combine the warm water, honey (you can heat the honey for a few seconds in the microwave if it is not pourable), egg, and vanilla extract. Beating just until the egg is well combined. Melt the shortening and add it to the wet ingredients, mixing until well combined.
- With a dough hook on your stand mixer, add the wet ingredients to the dry ingredients. With the stand mixer on low, mix the dough on low until the wet and dry ingredients are well combined.
- Once combined, knead the dough on medium speed for 8 minutes. The dough will still be somewhat sticky but workable. Using a bowl scrapper or your hand, shape the dough into a nice ball and place it into a lightly oiled glass bowl, flipping the dough to coat the top of the dough with oil as well.
- Cover the dough with plastic wrap (or a clean kitchen towel) and place in a draft-free slightly warm spot. Let rise for 1 to 2 hours, until it has almost doubled in size. Depending on the temperature of your home, the rise time for the dough will vary. In cooler climates, the dough may not double but should still have a noticeable rise.
- While the dough is rising, whisk to combine the cinnamon and sugar in a small bowl. Set aside.
- Once the dough has risen, turn it out onto a lightly floured, clean surface. Roll the dough out to a 12” long and 8” wide rectangle. Dust with the cinnamon sugar mixture leaving a clean edge (you can cover the edge with parchment if needed) and gently press into the dough.
- Roll the dough up from the long side toward the clean edge. Using a pastry brush (or even your finger), brush the clean edge with a little water. Then push the clean edge into the roll and smooth with your finger to adhere the dough together.
- Using a sharp serrated knife, cut off the pinched ends from the roll, about 1 1⁄2 inches per end. Then cut it equally into 1-inch pieces and place each piece onto a parchment-lined baking sheet with at least 2” space between them. The pieces should be oblong in shape. Press down lightly on each slice and lightly shape each one with your fingers, then let rise for about 45 minutes - until puffy, but not doubled in size.
Frying The Honey Buns
- Part of the way through the rise time, pour oil into a large pan or stockpot until the oil is about 3-inches deep. Heat over medium heat, until the oil reaches 365°F. I highly recommend using a clip-on pot thermometer to ensure your oil is at the correct frying temperature!
- Right before frying the buns, whisk together the glaze. In a medium-sized bowl, whisk to combine the powdered sugar, honey, melted butter, vanilla, and salt. Then add in about 1/3 cup (or up to 1/2 cup) of warm water, whisking until the desired consistency is achieved. If your glaze starts to develop a crust before you’ve glazed your honey buns, stir it and add a little water if needed to make it smooth again.
- Once the rolls have risen, gently press them down again with your fingers, then place a few honey buns into the hot oil, making sure not to crowd the pan. Fry for 90 seconds on one side, then flip and fry for an additional 90 seconds on the other side, until golden brown on both sides.
- Once honey buns are golden brown, remove them from the oil and place them onto a wire cooling rack over a paper towel-lined baking sheet. Immediately dip each bun into the glaze and return to the cooling rack. This will give it that crisp texture once set. Repeat the frying and glazing process with any remaining honey buns.
Baking the Honey Buns
- Preheat your oven to 350°F with the rack placed in the lower third of the oven. Once the rolls have risen, bake for 18 minutes or until the honey buns are lightly golden brown.
- Let them rest for 5 minutes after baking and then dip each bun into the glaze (or brush the glaze on) and place on a wire cooling rack.
Notes
Storage: Honey buns may be stored in an airtight container or baggie for up to 5 days. I like to microwave a leftover honey bun for about 5 to 10 seconds, just until warmed, before serving. They can also be frozen for up to three months.
Best The Next Day: These honey buns are delicious warm, but I personally think they are the best after they have sat in an airtight container on the counter for a day or two. This gives them that classic softness you expect from a store bought honey bun.
Yeast Tips: When working with yeast-based recipes such as this one, it is important to have the water at the correct temperature. If the water is too hot it will kill the yeast. Too cold and the yeast won’t activate, preventing the dough from rising properly. The ideal temperature is between 105°F-115°F. Read my notes in the post above if you prefer to use active yeast instead.
 Learn more about our Test Kitchen!
Learn more about our Test Kitchen!Video
Nutrition
Serving: 1 honey bun, Calories: 504kcal, Carbohydrates: 107g, Protein: 5g, Fat: 7g, Saturated Fat: 2g, Polyunsaturated Fat: 2g, Monounsaturated Fat: 3g, Trans Fat: 1g, Cholesterol: 22mg, Sodium: 194mg, Potassium: 63mg, Fiber: 1g, Sugar: 77g, Vitamin A: 64IU, Vitamin C: 0.1mg, Calcium: 14mg, Iron: 2mg