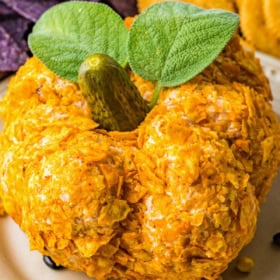

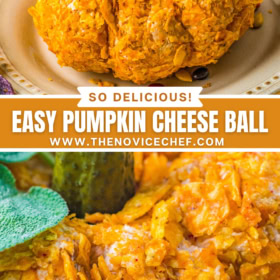
This Pumpkin Cheese Ball is a super cute appetizer perfect for Halloween, Thanksgiving or any other fall get-together! The crushed Doritos on the exterior add a crunchy, cheesy twist to this homemade cheese ball that’s always a hit at parties.
 plus crushed Doritos for a crunchy twist.")
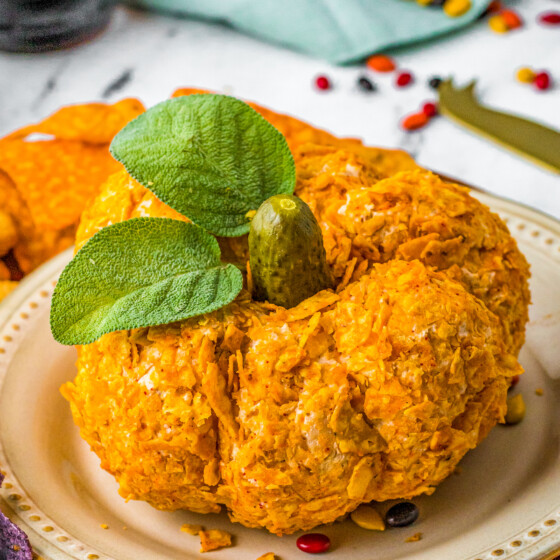
This simple pumpkin cheese ball is super fun and full of flavor. Emphasis on the flavor! It’s made with cream cheese, shredded cheddar cheese, crispy bacon bits, and a bit of ranch seasoning. Oh, and Doritos. The bright orange color is perfect for a pumpkin-shaped snack, and their cheesy flavor isn’t a bad addition either!
I thought this cheese ball appetizer could be a hit as a Thanksgiving appetizer, at Halloween parties, and other fall get-togethers… but honestly, we’ve ended up making it ‘just because’ more often than not. My kids LOVE it, as does my bacon loving husband. I think you (and your family) will love it too!
Why You’ll Love This Pumpkin Cheese Ball
- Super Kid-Friendly: Kids can be a part of the festivities by crushing up the Doritos and by helping decorate the cheesy Jack-O-Lantern.
- Quick: It takes me about 20 minutes to prep this cheese ball and then it’s ready for eating! Recipes that make hostessing easy are the best. 🙂
- Great for Parties: You can put this cheese ball on a charcuterie board, on its own plate, etc. It also goes with crackers, chips, veggies, and more. There are lots of serving choices if you’re feeding a crowd. Like I mentioned above, though, you can also just make a pumpkin cheese ball if you’re craving something cheesy – it’s totally up to you!
 plus crushed Doritos for a crunchy twist.")
What You’ll Need
Alright, let’s get into how we make this pumpkin cheese ball happen! Here’s a quick look at what you’ll need. Be sure to scroll down to the recipe card for a printable list.
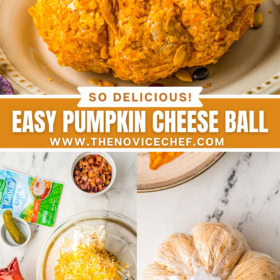
- Cream Cheese: Make sure you use room temperature cream cheese, which will be easier to mix with the other ingredients. Packaged (block) cream cheese is best, if possible.
- Cheddar Cheese: I like to use shredded smoked cheddar or sharp cheddar cheese.
- Worcestershire Sauce: For added savory flavor.
- Sour Cream: To help achieve a super creamy texture and add some tang.
- Ranch Seasoning: I generally use a fiesta ranch packet, but you can also use a traditional ranch seasoning packet if you aren’t a fan of the fiesta flavored one.
- Bacon: Chopped bacon bits add a little texture to this cheese ball as well as salt.
- Doritos: Crushed Doritos are perfect color-wise for creating a mini pumpkin. Other options would be something like orange crackers, cheez-it or goldfish crackers.
- Baby Pickle: You’ll need this and 2 leaves for the stem of the pumpkin. I used faux leaves because I had them on hand, but any green leaves (like fresh sage!) would work.
You’ll also need plastic wrap and some rubber bands to help you achieve the pumpkin shape.
 plus crushed Doritos for a crunchy twist.")
How to Make a Pumpkin Cheese Ball
This cheese ball is a perfect example of an it’s-okay-to-play-with-your-food recipe. It’s a blast to design, and even more fun to eat! I highly recommend hiring some little hands for the day to help you so that they can get in on the fun, too.
Here’s the step-by-step guide for this cheese-filled appetizer:
 plus crushed Doritos for a crunchy twist.")
 plus crushed Doritos for a crunchy twist.")
- Combine the Ingredients: In a large bowl, beat the cream cheese, sour cream, and Worcestershire sauce until well combined. Add the fiesta ranch packet and continue beating till combined. Fold in the shredded cheese and bacon.
- Wrap Your Cheese Ball in Plastic Wrap: Roll out a large sheet of plastic wrap on a flat surface. Empty your cheese ball mixture onto the center of the plastic wrap. Pull the edges of the plastic wrap together around the cheese ball mixture. Tightly twist the plastic wrap over the top of the cheeseball.
 plus crushed Doritos for a crunchy twist.")
 plus crushed Doritos for a crunchy twist.")
- Grab the Rubber Bands: Stretch three rubber bands around the cheese ball, dividing it into 6 equal(ish) sections. This will shape the ball into the pumpkin or jack o lantern shape. (Keep in mind that it doesn’t need to be perfect. That’s the beauty of it!)
- Chill the Cheese Ball: Place the ball with the rubber bands into the refrigerator for at least 1 hour to firm up and hold its shape.
 plus crushed Doritos for a crunchy twist.")
 plus crushed Doritos for a crunchy twist.")
- Roll It in Crushed Doritos: When you’re ready to serve, remove the rubber bands and plastic wrap. Place the crushed Doritos in a shallow bowl and roll and press the pumpkin cheese ball into the Doritos, until it’s completely coated.
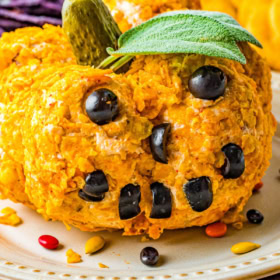
- Add the Stem and Leaves: Cut the baby pickle in half and insert one half into the top as the stem of the pumpkin. Place the leaves next to the stem.
 plus crushed Doritos for a crunchy twist.")
Tips for Success
- Use Two Layers of Plastic Wrap: If you want to make extra-sure that the plastic wrap will hold the cheese mixture while placing the rubber bands, use two layers of it.
- If You Don’t Have Rubber Bands: String will also work here when shaping the pumpkin. Just tie 3-4 circles of string around your cheese ball to achieve the same effect. This method is a little more cumbersome, but it does work.
- Let the Cheese Ball Chill: One hour is good, but overnight is even better. You want the pumpkin to settle into its shape, and the extra time also gives the flavors time to mingle.
- Jack-O-Lantern Decor: Decorate your pumpkin cheese ball with eyes and a toothy grin (using chopped black olives), if desired.
- Get Creative: Your creative flair can easily be showcased in this themed cheese ball. Here are some ideas for the stem, mouth, and eyes of the Jack O Lantern. The stem of a jalapeño or bell pepper makes a great pumpkin stem, as does a piece of celery, or a petite dill pickle. The leaves can be from a bag of spring salad mix, fresh basil, or parsley. Other optional stem ideas include: a green bean, a green pepper slice, or a green onion. The eyes and mouth can be cut to shape using black olives, blue corn chips, or black beans.
 plus crushed Doritos for a crunchy twist.")
Serving Suggestions
You can put this cheese spread on pretty much anything. Crackers, tortilla chips, potato chips, pretzels, vegetables (cucumbers, etc.), and toasted bread are some of my favorite options. I also like to put this cheese ball out with fresh fruit, sliced meats, and maybe a couple of other cheeses if I’m doing a charcuterie-style spread of appetizers.
 plus crushed Doritos for a crunchy twist.")
How to Store Leftovers
- Keep in the fridge: This easy pumpkin cheese ball will keep refrigerated in an airtight container – or sealed with cling wrap – for up to 7 days.
- Can I freeze it? Yes! You can freeze this cheese ball for up to 3 months. For freshness and storage purposes, do not coat in Doritos until ready to serve.
Pumpkin Cheese Ball
Ingredients
- 1 (8 oz) package cream cheese, room temperature
- 1 ½ cups shredded smoked cheddar or sharp cheddar cheese
- 1 tablespoon Worcestershire sauce
- ¼ cup sour cream
- 1 (1.1 oz) fiesta ranch packet
- 4 slices bacon, cooked and finely chopped
- Plastic Wrap
- 3 large rubber bands
- 2 cups Doritos, crushed
- 1 baby pickle and 2 leaves – garnish
Want to save this recipe?
Instructions
- In a large bowl, beat the cream cheese, sour cream, and Worcestershire sauce until well combined. Add the fiesta ranch packet and continue beating till combined. Fold in the shredded cheese and bacon.
- Roll out a large sheet of plastic wrap on a flat surface. Empty your cheese ball mixture onto the center of the plastic wrap.
- Pull the edge of the plastic wrap together around the pile of cheese ball mixture. Bring up all sides of the plastic wrap and at the top twist together tightly around the cheese ball.
- Place one rubber band around the middle of the cheese ball. Then place another rubber band a third of the way around the ball and place the third rubber band around the middle opposite the first rubber band. This will shape the ball into the pumpkin or jack-o-lantern shape. It doesn’t need to be perfect – that’s the beauty of it!
- Place the ball with the rubber bands into the refrigerator for at least 1 hour to firm up and hold its’ shape.
- When ready to serve, remove the rubber bands and plastic wrap. Place the crushed Doritos in a shallow bowl and roll and press the pumpkin cheese ball into the Doritos, till completely coated.
- Cut the baby pickle in half and insert one half into the top as the stem of the pumpkin. Place the leaves next to the stem.
- Jack-o-lantern Decor: Cut and decorate the eyes and toothy grin with black olives, as desired.
- Serve cheeseball with chips and/or crackers.
⭐️ Tried this recipe? Leave a comment and rating! It only takes a minute and helps support our family-run blog. ❤️
Notes
Nutrition
Categories:
More of the Best Cheese Ball Recipes
- This easy cranberry cheese ball is perfect for holiday entertaining!
- Pine cone cheese ball is picture perfect – and scrumptious.
- Calling all pickle lovers – you’ve gotta make my dill pickle cheese ball recipe!
- Decorate your Thanksgiving spread with this adorable turkey cheese ball.
Post may contain affiliate links. Read my disclosure policy.
