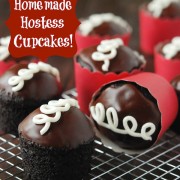
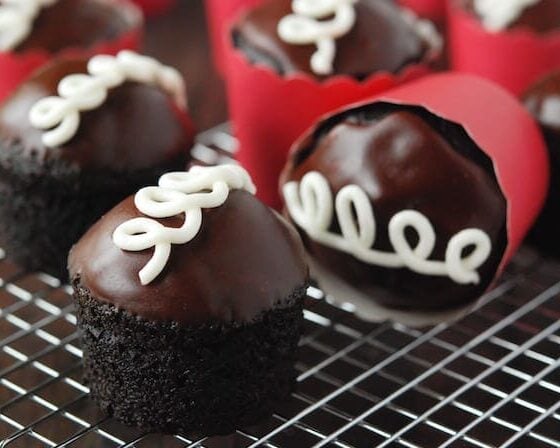
Homemade Hostess Cupcakes are a fun version of a classic snack! These rich chocolate cupcakes filled with marshmallow creme and topped with chocolate icing are not to be missed, trust me.

Classic Hostess Cupcakes Copycat Recipe
I’m going to warn you: If you’re determined to start your diet tomorrow, turn back now. Unless you have the willpower of a superhuman. In that case, proceed with caution. Because for the love of everything chocolate, it’s next to impossible to resist these homemade Hostess cupcakes.
Luckily, we have a long time to go until January, when all those pesky resolutions make an appearance. So you may as well enjoy these utterly delicious, double-chocolate, creme-filled cupcakes while you can! I’ll go ahead and say it: these homemade Hostess cupcakes are way better than any store bought version I’ve ever had.
What Are Hostess Cupcakes?
Oh my goodness! You have not lived until you’ve had a classic Hostess cupcake. They’re a prepackaged American snack cake similar to Twinkies and Ding Dongs.
If it sounds like I’m speaking gibberish, bear with me! Hostess cupcakes are traditionally a dark chocolate cupcake filled with vanilla creme and topped with chocolate icing and a distinctive white squiggle. They’re a sugary, nostalgic treat and, as it happens, they’re so much fun to make at home!

Ingredients You’ll Need
It may look like there’s a lot going on in this list, but don’t be daunted! Most of the ingredients for these copycat Hostess cupcakes are common pantry ingredients.
For the Cupcakes:
- Sugar & Flour: Regular granulated sugar and all-purpose flour will give you the most consistent results when baking these dark chocolate cupcakes.
- Cocoa Powder: Dutch process cocoa powder, or the darkest you can find.
- Leavening: Baking powder and baking soda for light and fluffy cupcakes.
- Oil: Vegetable oil, or another neutral oil, to give the cupcakes a super moist and tender crumb.
- Vanilla: Pure vanilla extract is best, but imitation will also work in a pinch.
- Milk & Egg: Whole milk is perfect for the cupcake batter, filling, and icing. You’ll also need a single egg to bring extra moisture to the cupcakes.
- Salt
For the Filling & Icing:
- Butter: Unsalted butter that’s been brought to room temperature, for the creamy texture in the icings and “Hostess” filling.
- Marshmallow Creme: Also known as marshmallow fluff, this gives the filling the distinct marshmallow flavor.
- Powdered Sugar: For an extra jolt of sweetness and a smooth, luxurious texture, I use powdered sugar (confectioner’s sugar) in the cupcake filling as well as the vanilla icing.
- Light Corn Syrup: Corn syrup lends an ultra-smooth texture to the chocolate icing. You can also use alternatives lie brown rice syrup or maple syrup if needed.
- Dark Chocolate: A decent quality 70% bittersweet chocolate, chopped into pieces.

How to Make Homemade Hostess Cupcakes
As you’ll see, these Hostess cupcakes are made in four parts: the cupcakes, the filling, a chocolate icing layer, and the famous vanilla squiggle across the top. It might sound like a tall task, but it’s actually so easy to make them from scratch! Here’s what you need to do:
Make the Cupcakes: Combine the dry ingredients in one bowl, and the wet ingredients in another. Alternate adding the dry mixture and milk into the wet mixture until a smooth batter forms. Fill a lined cupcake tin about ⅔ full with the chocolate batter, and then pop the cupcakes into a preheated oven. Once they’re done, leave them to cool while you prepare your filling!
Fill the Cupcakes: Cream the filling ingredients together in a stand mixer until the marshmallow mixture is light and fluffy. Using a piping bag, carefully pipe the marshmallow filling into the centers of the cupcakes. You don’t need to be precious about filling that peeks out – the chocolate icing will soon cover that up.
Top With Chocolate Icing: Melt down the ingredients for the chocolate icing in a saucepan. Working quickly but steadily, you’ll dip the tops of your filled chocolate cupcakes into the icing and transfer the cakes to a wire rack.
Make the Squiggle: While the chocolate icing is setting, cream together the vanilla icing ingredients and then transfer the icing to another piping bag. Using a small tip, pipe your very own version of the Original Squiggle® across the tops of the cupcakes. And there you have it! Delicious homemade copycat Hostess treats.
Tips for Success
- Let the Icing Set: Only fill and ice the cupcakes once they’re cooled down, and give the chocolate icing plenty of time to harden before adding the white squiggle. Leave some extra time for the vanilla icing to set as well before serving!
- Practice Piping the Squiggle: If you’re not too icing-savvy, do a few practice loop-de-loops with the piping bag on a piece of parchment paper before going ahead with the cupcakes. Apply gentle, consistent pressure in order to get the smoothest swirl!
Variation Ideas
- Use Fruit Filling Instead: Swap out the marshmallow cream filling with fruit preserves, jam, or jelly. Try flavors like raspberry, blueberry, or strawberry, or even something more adventurous like lemon curd or marmalade.
- Make Triple Chocolate Cupcakes: Why stop at chocolate cupcakes with chocolate icing? Make this Hostess copycat recipe with an extra handful of semi-sweet chocolate chips tossed into the batter!
- Customize the Toppings: While the white squiggle is classic to the Hostess brand, don’t let that stop you from getting creative with your favorite cupcake toppings! Sprinkles, chocolate chips, nonpareils, mini marshmallows and candies can all be added to the cupcakes (before the icing hardens, to make sure they stick!).
How to Store Creme Filled Cupcakes
Since the filling and icing contain milk, store your filled cupcakes airtight in the fridge for up to one week. Take them out 15 minutes before serving to let them come to room temperature.
Can I Freeze These?
Yes! These homemade Hostess cupcakes can be stored in the freezer for up to 3 months. Make sure to seal the cooled cupcakes tightly in an airtight container or freezer bag. Thaw the cupcakes in the fridge before serving.
Homemade Hostess Cupcakes!
Ingredients
For the Cupcakes:
- 1 ⅓ cup all purpose flour
- ½ cup dutch process cocoa powder, or really dark cocoa powder
- ¾ teaspoon baking powder
- ¾ teaspoon baking soda
- ½ teaspoon salt
- 1 large egg
- 1 cup granulated sugar
- ¼ cup vegetable oil
- 1 teaspoon vanilla extract
- 1 cup whole milk
For the Filling:
- 4 tablespoons unsalted butter, at room temperature
- 1 cup powdered sugar
- 2 teaspoons pure vanilla extract
- 1 tablespoon milk
- 1 cup marshmallow creme, the jar of marshmallow fluff
For the Chocolate Icing:
- 2 tablespoons butter
- 1 tablespoon milk
- 2 teaspoons light corn syrup
- 2 ounces 70% bittersweet chocolate, chopped
- ½ cup powdered sugar, sifted
For the Vanilla Icing:
- 8 tablespoons unsalted butter, room temperature
- 1-2 tablespoons milk
- 2 cups powdered sugar
- 1 tsp vanilla
Want to save this recipe?
Instructions
Cupcakes:
- Preheat oven to 350°F. Line a muffin tin with cupcake liners.
- Stir together flour, cocoa, baking powder, baking soda and salt in medium bowl. Set aside.
- In a large bowl whisk egg, sugar, oil and vanilla; stirring till there are no lumps. Then add flour mixture, alternating with milk, until you have a smooth batter.
- Fill cups 2/3 full with batter. Bake 20 to 22 minutes. Remove from oven and allow to cool completely.
Filling:
- Using a stand mixer, cream the butter until light and fluffy, about 2 minutes. Beat in confectioners’ sugar. Add the vanilla and milk and beat until smooth. Beat in the marshmallow creme.
- Transfer filling into a pastry bag with a long filling tip. Insert the tip into the center of each cupcake and fill until the cupcake is slightly heavier. It’s OK if some of the filling peeks out a little, it will be covered by the chocolate icing layer.
Chocolate Icing:
- In a small saucepan over medium heat, melt butter. Add milk, corn syrup and chopped chocolate, stirring slowly to allow chocolate to melt completely.
- Once melted, remove from heat and whisk in sifted powdered sugar. Immediately dip the top of each cupcake into the icing and transfer to a wire rack. Let icing set (about 10 minutes), before moving on to the next step.
Vanilla Icing:
- Using a stand mixer, cream the butter until light and fluffy, about 2 minutes. Beat in confectioners’ sugar. Add the vanilla and milk and beat until smooth. If the icing is too stiff, add in a little more milk.
- Transfer icing into a pastry bag with a small tip. Pipe in a swirl decoration on top of the cupcakes.
- Store cupcakes in the fridge and allow 15 minutes to warm up before serving.
⭐️ Tried this recipe? Leave a comment and rating! It only takes a minute and helps support our family-run blog. ❤️
Nutrition
Post may contain affiliate links. Read my disclosure policy.

great recipe and love the idea of chocolate cup cakes. looking forward to trying out the recipe.
When do you add the milk and sugar to the cupcakes?
Oops! The milk was there (you add it alternating with the flour mixture), however I did somehow leave out the sugar! The recipe is corrected now. Happy baking! 🙂
I made these and they were great! But the cupcake recipe didn’t say when to add the 1 C sugar to the cake part of the recipe. I added it w/ the egg and oil part of the cake instructions.
Also, I couldn’t find marshmallow creme at the store, so I made a package of Jello Pudding – White Chocolate flavor – delish!
I found it hard to pipe it into the center of the cupcake and know how much was going in – I didn’t get as much filling in as I would have liked.
For the white icing for the curlicue design, I halved that and that was plenty.
These tasted wonderful – just like the originals, only better because it’s homemade.
If you come up with a recipe for twinkies you would make national news!!!! I’m going to try these just because they look so tasty and I used to eat them when I was a kid…..and I took a big bite of everything at once also.
Great recipe, and super quick!
I wonder if this would work as a cake pop in the babycakes machine? I may have to experiment with this one – my husband would love me forever if I could make him mini hostess cupcakes whenever he wanted. 🙂
Oh Yes, Twinkies. I grew up on them !
And devil dogs please!
Now you need to show us a twinkie recipe!
I thought of your cupcakes when I heard the news.
I have made these twice already and they are a hit at the office! Whew, saved by The Novice Chef!
Wonderful recipe – thanks!! It’s so sad that Hostess has shut down. 🙁
They look so good! Where did you get the cupcake liners? I bought some at Surfas but they don’t carry them any more. I love that you don’t have any pan to clean up. It makes baking cupcakes so easy.
I found them at TJ Maxx! They had tons of colors!!! 🙂
You don’t have to tell me twice!
BTY, bought your donut book and it’s awesome!
OMG, I love this!!!! These look fantastic and perfect!!! and love that you wrote directions while watching a rerun of Friends. . hilarious!! 🙂
Jessica, these are so FUN!
Totally put off a diet for these!
um yes, love the Friends advice in there with the cupcakes! 🙂
Ohh I am making these TODAY!
Congrats on the cookbook
Found you after Iowa Girl Eats linked to these! Where did you find the most perfect cupcake holders??
I found them at TJ Maxx! They had tons of colors!