


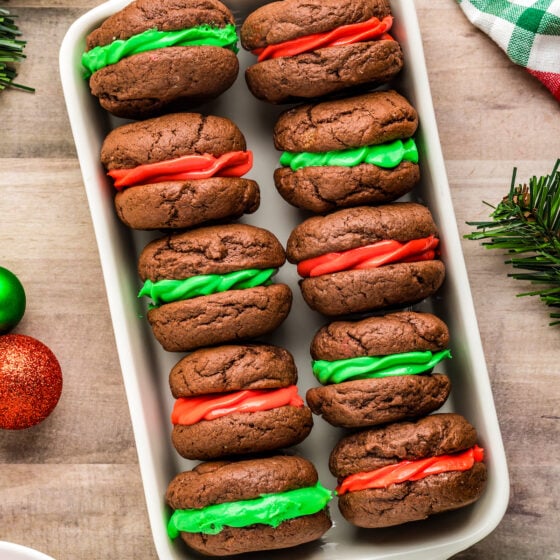
These Easy Christmas Whoopie Pies are rich and chocolatey, with creamy, tinted marshmallow filling for Christmas! Boxed cake mix makes this whoopie pie recipe extra simple.

A Fun Christmas Dessert Cake Recipe!
While many Christmas recipes are all about grand combinations of expensive ingredients, some are just plain fun. This is one of the fun ones. By using a boxed cake mix, these whoopie pies are super easy and quick to make! Devil’s food whoopie pies are a cinch to make, and with their tinted marshmallow filling, they’re a cute and scrumptious treat for the holidays!
This is a recipe that’s great for snacking or dessert. They’re equally at home with a cold glass of milk or a cup of Peppermint White Hot Chocolate. One of my favorite times to enjoy a festive dessert like this would be on Christmas Eve or the first night of Christmas vacation – kids adore whoopie pies, and it’s a little something different from the usual cookies and milk.
Looking for more festive Christmas cookies? I rounded up all my recipes in this post: 101 Best Christmas Cookie Recipes!

Why Are They Called Whoopie Pies?
It’s not exactly clear where the name whoopie pie comes from. The actual dessert seems to have come from the Amish communities in New England, and some sources say that the name whoopie pie came about because Amish farmers would find these little cookies in their lunchboxes and say, “Whoopie!” I’m not sure that’s a provable theory, but it is memorable! (And kind of relatable – who wouldn’t rejoice at finding a marshmallow-filled chocolate cookie cake in their lunchbox, right?)
What Is Whoopie Pie Filling Made Of?
So I keep saying that these whoopie pies have a marshmallow filling, but what does that mean? In this case, it’s not just marshmallows. This filling is made with creamy, light marshmallow fluff, but it also includes cream cheese for extra richness and a slightly tangy flavor. Some vanilla brings the two ingredients together, making a truly indulgent, bakery-style frosting.

Ingredients
To make these Christmas-themed whoopie pies, I recommend taking the easy route and using a boxed cake mix. It’s so simple, and cuts down on the time you’ll need – and the results? Completely delicious.
For the Cookie Halves
- Cake Mix: One standard-sized (15.25 oz) box of devil’s food cake mix.
- Eggs: For best results, have your eggs at room temperature (but no worries if they’re straight from the fridge).
- Oil: A neutral oil, like vegetable oil, keeps the cake moist without weighing it down.
For the Marshmallow Filling
- Cream Cheese: 8 oz cream cheese, room temperature
- Marshmallow Fluff: This sweetly addictive snack food might seem over the top, but it actually contains less sugar than most jams and jellies. Win-win!
- Vanilla: Pure vanilla extract gives the best flavor, but regular vanilla flavoring is fine as well.
- Salt: You don’t need much salt to make this frosting. Just a pinch brings out the vanilla flavor, and cuts a little of the sweetness.
- Food Coloring: I use gel food coloring to tint the frosting for some of the whoopie pies red, and the rest green.

Let’s Make Christmas Whoopie Pies!
The baking and frosting process for these cookies couldn’t be simpler. Let’s dive in and make some Christmas whoopie pies, complete with pretty red and green frosting.
- Prep the Oven, Baking Sheet, and Cookie Batter. First, as with most baking recipes, make sure to preheat your oven. It needs to heat to 350°F. Next, line a couple of large cookie sheets with parchment paper, and set them aside. Finally, combine the cake mix, eggs, and oil in a large mixing bowl, and stir them to make a thick batter.


- Shape the Cookies. Now you will need to shape the cookies and place them on the prepared cookie sheets. Scoop a tablespoon of cookie dough, and use your hands to roll it gently into a ball. Place this on your parchment-lined cookie sheet, and repeat until all of the dough is used. The cookie dough balls need to be about an inch and a half apart. Flatten them out a little with your hand or the bottom of a drinking glass, sprayed lightly with cooking spray.
- Bake. Bake the cookies for 8 to 10 minutes, or until the edges are set. Don’t overbake them or they will not have a soft, cakey texture. Take them out of the oven and let them cool for about 5 minutes on the cookie sheet, and then move them to a wire rack to cool completely.

- Make the Marshmallow Filling. In the bowl of a stand mixer, or in a mixing bowl with a hand mixer, combine the cream cheese, marshmallow fluff, vanilla, and salt. Beat these ingredients to make a smooth, fluffy filling.


- Tint the Filling (Optional). If you want to color your filling, transfer half of it to a separate bowl. Add 4 to 5 drops of red food coloring to one bowl, and 4 – 5 drops of green food coloring to the other bowl. Mix well (with a separate spoon for each bowl!) until the coloring is evenly blended into the filling, with no streaks of white.
- Fill the Whoopie Pies. Once the cookies are completely cool, they are ready to fill. Spoon the fillings into separate piping bags. Pipe red filling onto six cookies, and green filling onto six cookies. Then top each one with an unfrosted cookie.
- Enjoy!


Baker’s Notes
To make sure that your Christmas whoopie pies turn out just right, I’m including these tried-and-true recipe notes for baking and filling. Enjoy!
- Cake Flavors: You can use any cake mix in this recipe. I like the richness of the devil’s food cake. Red velvet would also be great for Christmas.
- Shaping: Be sure to flatten the cookie dough balls slightly before baking, because they will not spread out much in the oven. If you skip this step, the cookies will be small and thick, which makes them awkward to eat once they’re sandwiched together with filling.
- Filling Texture: The filling will be soft, but it should not be runny – you want it to “glue” the cookie halves together easily. If it is too soft to pipe, you can put it in the refrigerator for 15 minutes or so to firm up. Alternatively, you can add ¼ cup of powdered sugar to the filling to firm it up.
- Food Coloring: I recommend using gel food color in this recipe, partly because it gives a more vibrant color with less product, but also because it adds less moisture to the filling. Regular liquid food coloring may thin the filling too much, and make it runny.
- Piping the Filling: Be mindful not to overfill the cookies. If you add too much filling, it will spill out the sides once the top cookie is added!
- Piping Tip: I used a Wilton 1M piping tip to pipe the filling. However, a piping tip is completely optional. You can also just spoon the filling into a zip-top bag, snip the corner of the bag off with scissors, and pipe the filling through the cut corner. It’s a good idea to cut the corner small at first, and make it a little larger if needed.

Sweet Variations
Want to make these whoopie pies a little more special? Here are some quick and easy variations that you can add to the recipe in a snap.
- Add Sprinkles: Roll each filled whoopie pie gently in a dish of your favorite seasonal sprinkles, so that they stick to the filling mixture.
- Chopped Nuts: Fold your favorite chopped nuts into the filling mixture before piping, or press them into the filling like sprinkles.
- Add Fruit: You can put a surprise fresh raspberry or halved maraschino cherry in the center of each whoopie pie before covering it with filling. It is important to use fruit that has been carefully dried with paper towels, so the pies don’t get soggy.

How to Store Whoopie Pies
These are incredibly easy to store! Just place them in an airtight container and place in the fridge for up to 10 days.
Can You Freeze Whoopie Pies?
Yes – and how cool (pun intended) would it be to have these stashed in your freezer ahead of the big day?
If you decide to freeze these whoopie pies, wrap them each individually in plastic wrap and then pack them into freezer bags. Freeze for up to 3 months, add thaw to room temperature before serving.
Easy Christmas Whoopie Pies
Ingredients
Cookies:
- 1 15.25 oz box devil’s food cake mix
- 2 large eggs
- ⅓ cup oil
Marshmallow Filling:
- 8 oz cream cheese, room temperature
- 7 oz marshmallow fluff
- 1 teaspoon vanilla extract
- Pinch of salt
- Red and green gel food color
Want to save this recipe?
Instructions
- Preheat the oven to 350°F. Line two large cookie sheets with parchment paper and set aside.
- In a large bowl, stir to combine the cake mix, eggs and oil until well combined. (The batter will be thick!)
- Scoop 1 tablespoon of cookie dough and roll into a ball. Place cooke dough balls onto the prepared cookie sheets, leaving room for spreading (about 1.5 inches between each ball).
- Slightly flatten the dough balls with the palm of your hand, or use the bottom of a glass (spray it with non-stick spray) and lightly press the dough.
- Bake for 8 to 10 minutes, or until the edges are set. Allow the whoopie pies to cool for 5 minutes on the cookie sheet. Then transfer to a wire rack to finish cooling completely before filling.
Marshmallow Filling:
- In the bowl of a stand mixer, or in a bowl with a hand mixer, beat the cream cheese, marshmallow fluff, vanilla, and salt, until smooth and well combined.
- If you want to color your filling, add half of the filling to a separate bowl and add 4-5 drops of red food color. Mix until well combined and no streaks of white remain. Repeat with the remaining filling and the green food color.
- Add each filling to a separate piping bag. Pipe the bottom of six completely cooled cookies with the red filling. Repeat with six more cookies and the green filling. Top with the remaining 12 cookies and enjoy!
⭐️ Tried this recipe? Leave a comment and rating! It only takes a minute and helps support our family-run blog. ❤️
Notes
Storage:
Whoopie Pies can be stored in an airtight container, in the fridge, for up to 5 days.Recipe Notes:
- Be sure to flatten the cookie dough slightly before baking. These cookies do not spread a lot during baking. If you do not flatten the cookies you will end up with small thick cookies which will be awkward to eat once sandwiched together.
- You can use any cake mix in this recipe. I like the richness of the devil’s food cake. Red velvet would also be great for Christmas.
- The filling will be soft, but should not be runny. If it is too soft to pipe, place it in the refrigerator for 15 minutes or so to firm up. Alternatively, you can add ¼ cup of powdered sugar to the filling to firm it up.
- I recommend using gel food color in this recipe. Gel color will result in a more vibrant color using less product. The liquid food color will add more moisture to the filling causing it to be too runny.
- Be mindful not to overfill the cookies. If you add too much filling it will spill out the sides once the top cookie is added.
- I used a Wilton 1M piping tip to pipe the filling, however, a piping tip is completely optional. You can simply cut the end off the bag and pipe the filling.
Nutrition
More Christmas Dessert Recipes
- Soft Gingerbread Man Cookies
- Easy Nanaimo Bars
- Frosted Sugar Cookie Bars
- Gingerbread Man Cookies
- Peppermint Meringues
- Best Christmas Crack
- Eggnog Cheesecake
- Peppermint Oreo Truffle Balls
Post may contain affiliate links. Read my disclosure policy.
