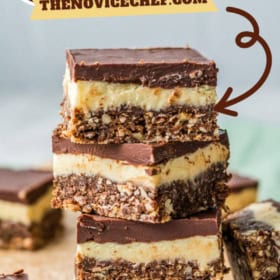

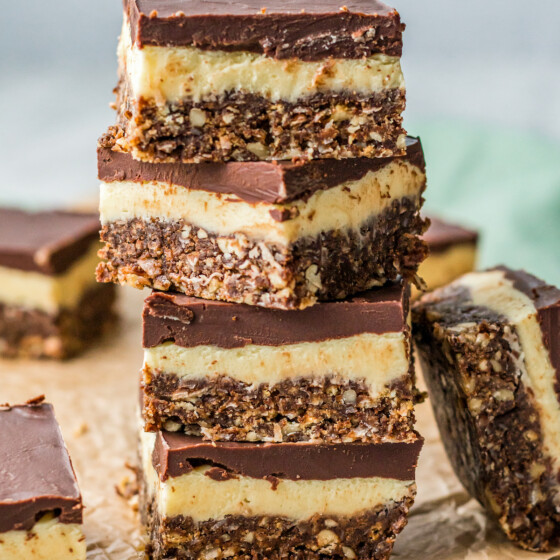
Triple-layered Nanaimo Bars are a rich, no-bake dessert that’s easy to make! A chocolate-graham-cracker crust, studded with chopped nuts and shredded coconut, is topped with thick vanilla custard and a shiny layer of hardened chocolate.

A Decadent No-Bake Dessert Bar
When it comes to rich, dense, decadent treats, nothing beats a bar cookie. I use the term loosely, because a lot of the very best bars aren’t really cookie-like: they have a granola texture, a cakey texture, a brownie texture… but for the sake of simplicity, “bar cookie” is an easy name to use, right?
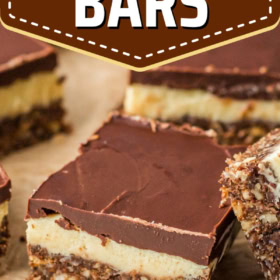
These particular bar cookies are especially unique in their texture, because they have three very distinctive layers. That’s what makes them so special and such a treat! Each square of this decadent bar cookie has a richly flavored, buttery crust made with graham crackers, cocoa powder, and coconut. The middle layer of the bars is a vanilla custard that’s thick and creamy, and on top is a layer of ganache-like chocolate, which hardens after the bars are cut.
Are you craving Nanaimo bars yet? I know I am!
What Exactly Are Nanaimo Bars?
These triple-layered bar cookies have an unusual name, for sure! They’re named after the city where they were invented, Nanaimo, British Columbia. Nanaimo bars are a Canadian favorite that has become popular stateside, as well, and it’s easy to see why! No one could resist the crumbly chocolate graham-cracker crust filled with shredded coconut, topped with creamy custard, and a layer of firm, milky chocolate!

The Ingredients!
Here are the scrumptious ingredients to make these no-bake delights. Fair warning: Just reading through this list may totally trigger a chocolate craving… and a coconut craving… and a custard craving!
For the Crust
- Graham Cracker Crumbs: You can make your own very easily and quickly, by running them through a blender.
- Coconut: Shredded coconut adds sweetness and texture.
- Chopped Nuts: I use pecans and walnuts, but you can use whatever you like!
- Butter: Using salted butter in the crust mixture guarantees a satisfying, salty-sweet result.
- Cocoa Powder: The cocoa powder blends with the butter to make a dark chocolate crust mixture.
- Sugar: You don’t need much sugar, since the graham crackers are already sweet.
- Egg: A large whole egg helps bring the crust together.
For the Filling
- Powdered Sugar: AKA confectioner’s sugar, this soft sugar dissolves easily into the custard.
- Instant Pudding: Vanilla flavor
- Cream: Heavy cream adds incredible richness to the easy filling mixture.
- Vanilla: A little additional vanilla extract makes this custard filling so much more flavorful and homemade-tasting.
For the Topping
- Chocolate Chips: Melted chocolate chips are the basis of the ganache-like topping.
- Butter and Cream: Added butter and cream turn the melted chocolate into a rich, fudgy top layer for our Nanaimo Bars.

How to Make These Easy Nanaimo Bars
Making these bars is similar to making most other no-bake layered desserts, except that you will need to incorporate an egg! To cook the egg, it is tempered with a little bit of hot butter-cocoa mixture, and then mixed fully into the hot butter-cocoa mixture to finish coming to a safe temperature.

Make the Crust
- Prep the Pan and Dry Ingredients. Before you get started on the crust, line a 9-inch square baking dish with parchment paper, and set it aside. Next, combine the graham cracker crumbs, coconut, and chopped pecans and walnuts in a large mixing bowl.
- Make the Melted Butter Mixture. Melt your butter in a small saucepan over medium heat. Once the butter is melted, add the cocoa and sugar, whisking until the sugar dissolves.
- Temper the Egg and Add to the Butter Mixture. Beat the egg lightly. Whisking continuously, add a couple of spoonfuls of the hot butter mixture. Then pour the egg mixture into the cocoa mixture, still whisking constantly. Whisk over medium heat until the mixture thickens. This won’t take long! Quickly remove the thickened butter mixture from the heat so it doesn’t curdle.
- Make the Crust. Pour the butter mixture into the graham cracker mixture, and stir it well. This is the crust for your Nanaimo bars. Dump it into the prepared pan, and press down to make an even layer. Let the crust cool completely before adding the layer. It’s best to chill the crust for 15 minutes (or longer) before continuing.

Make the Filling
- Combine the Filling Ingredients. In a medium bowl, whisk together the instant pudding mix and the powdered sugar. Pour the heavy cream and vanilla in, and whisk until smooth.
- Add the Filling to the Bars. Pour the filling over the cooled crust, and smooth it out evenly with a spatula.
- Chill. Chill the filling for about 10 minutes before adding the chocolate topping.

Make the Topping
- Melt the Chocolate. To melt the chocolate chips, place them into a microwave-safe bowl and microwave on high for 15-second intervals. Stir each time, until they are smooth.
- Add the Butter and Cream. Stir the heavy cream and butter into the chocolate until the mixture is smooth.
- Top the Bars. Spread the chocolate evenly over the filling layer. Allow the topping to set for 3 – 4 minutes before cutting the bars into squares. After cutting, allow the bars to fully harden before serving.

Handy Tips and Hacks
Everyone has their own tips and tricks for making Nanaimo bars the easy way, or the quick way, or what have you, and I’m no exception! Here are my best hacks for creating decadent Nanaimo bars that look (and taste) just right.
- Cutting the Bars: It’s important to cut the bars when the chocolate layer is almost set, but not fully hardened. If you try to cut the bars when the chocolate is set, it often cracks or presses the custard layer down. I also recommend using a very sharp knife and warming it in a bowl of hot water between cuts.
- Egg Tempering: Even professional pastry chefs sometimes struggle to temper eggs without scrambling them! If you temper the egg and find that the mixture is a little bit lumpy or scrambled, you can pour it through a strainer or fine sieve to remove the lumps. If it is very lumpy, you may have to re-make it so that the custard thickens correctly.
- A Little Goes a Long Way: With so much sweetness and richness in every bite, these squares are best cut small. You can cut one pan into 16 small squares.
- Variations: There are lots of fun variations on classic Nanaimo bars, but my favorite way to customize them is by adding extracts to the custard mixture! A tiny bit of mint, rum, or orange extract is all you need to make mint-chocolate Nanaimo bars, sweet rum Nanaimo bars, or orange-chocolate Nanaimo bars!

How Should I Store Extra Bars?
Nanaimo bars should be stored in the refrigerator, to protect the custard and chocolate and prevent them from melting. Here’s how!
- Place the bars in airtight containers, preferably shallow ones, so you can store in a single layer without excess air. If you must store in more than one layer, use parchment or wax paper to separate them.
- Keep the bars in the refrigerator for up to 2 weeks, or in the freezer for up to 6 months.
- Thaw frozen bars overnight in the refrigerator, before serving.
Can I Make Nanaimo Bars In Advance?
Yes! Since the bars freeze well and refrigerate well, you can make them up to 6 months in advance (store in the freezer and thaw overnight), or two weeks in advance (store in the refrigerator). Serve chilled.
Easy Nanaimo Bars
Ingredients
For the Crust
- 1 ½ cups graham cracker crumbs, about 1 ½ large packages, put through a blender
- 1 cup sweetened shredded coconut
- ¼ cup chopped pecans
- ¼ cup chopped walnuts
- ½ cup salted butter
- ¼ cup cocoa powder
- ¼ cup granulated sugar
- 1 egg, lightly beaten
For the Filling
- 1 ¾ cup powdered sugar
- 2 tablespoons instant vanilla pudding
- ¼ cup heavy cream
- 1 teaspoon vanilla
For the Topping
- 8 ounces semisweet chocolate chips
- 3 tablespoons butter
- 2 tablespoons heavy cream
Want to save this recipe?
Instructions
- Make the Crust
- Line a 9-inch square baking dish with parchment. Set aside.
- Place the graham cracker crumbs, coconut, and nuts in a large mixing bowl.
- In a small saucepan over medium heat, melt the butter. Add the cocoa and sugar, whisking until well combined and the sugar is melted.
- Place the egg in a bowl and whisk in a couple of spoonfuls of the hot cocoa mixture. Then pour the egg mixture into the cocoa mixture over medium heat, whisking constantly. The mixture will thicken quickly; remove from the heat so that the eggs do not curdle and become lumpy.
- Pour the butter mixture into the graham cracker mixture and stir thoroughly to combine. Pour into the prepared pan, and press down to make an even layer.
- Let the crust cool completely before adding the layer. You can chill the crust for 15 minutes (or longer) before continuing.
- Make the Filling
- In a medium bowl, whisk together the instant pudding mix and powdered sugar. Add the heavy cream and vanilla, and whisk until smooth.
- Pour the filling over the cooled crust, and smooth into an even layer using a spatula.
- Chill for 10 minutes.
- Make the Topping
- Place the chocolate chips and butter in a microwave-safe bowl. Microwave on high for 15-second intervals, stirring each time, until smooth. If there are any lumps, microwave an additional 5 – 10 seconds.
- Stir the heavy cream into the chocolate until smooth.
- Spread evenly over the filling layer. Allow to set for 3 – 4 minutes before cutting. After cutting, allow the chocolate to fully harden before serving.
⭐️ Tried this recipe? Leave a comment and rating! It only takes a minute and helps support our family-run blog. ❤️
Nutrition
More No-Bake Treats
- Pecan Pie Truffles
- Marshmallow Popcorn Balls
- Cinnamon Sugar Toffee
- Butterscotch Haystacks
- Peanut Butter Pretzel Crockpot Candy
- Best Ever Rice Krispie Treats
- Chocolate Peanut Butter Bars
- Easy Banana Pudding
- The Best Christmas Crack
Post may contain affiliate links. Read my disclosure policy.

I absolutely loved these Nanaimo Bars. They brought back so many nostalgic memories, and the flavor was spot on. The bottom layer was rich and chewy, the custard filling was perfectly creamy, and the chocolate topping set just right. I made them for family, and everyone kept going back for another piece. They were easy to make, looked beautiful once sliced, and tasted even better the next day. This is definitely a recipe I’ll be making again and again.