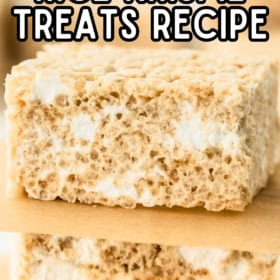
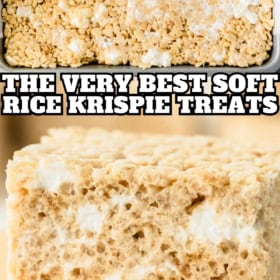

This Rice Krispie Treat recipe is made with triple the marshmallows for extra thick, chewy, and perfectly gooey bars! You only need 5-ingredients: marshmallows, crispy rice cereal, butter, salt, and vanilla.

Recipe Rundown: What To Know
- No-Bake: No need to preheat the oven.
- Extra Gooey: Uses extra marshmallows so they melt-in-your-mouth!
- 5 Ingredients: This dessert definitely won’t break the bank.
- Make Them Your Own: Add different flavorful mix-ins or food coloring.
- Kid Favorite: My kids truly love eating (and making!) these treats.
- Great for Gifting: Always a hit for potlucks, bake sales, or lunch boxes!
What Makes This The BEST Rice Krispie Treat Recipe?
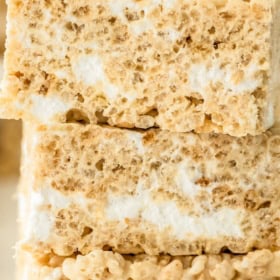
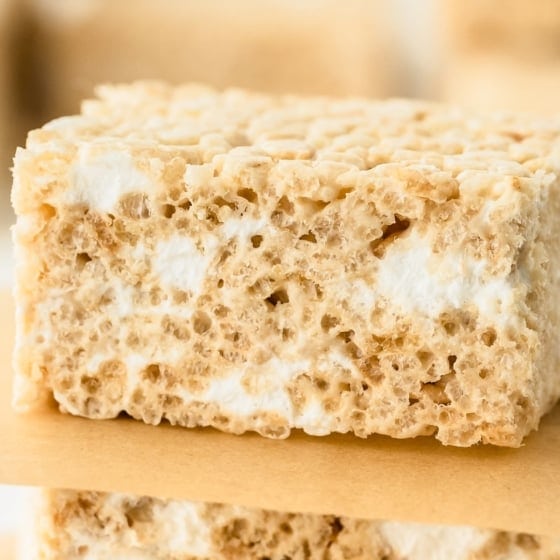
The secret to the best Rice Krispie treats lies in the ingredient ratios and technique. We use significantly more marshmallows than the standard recipe (almost triple!) to ensure every bite is rich and melt-in-your-mouth soft. This generous amount of marshmallows creates that signature gooey pull and gives the bars a soft chew instead of a dry crunch.
By also ensuring you don’t pack them down too much into the pan, these treats will always stay ultra-soft, thick, and irresistibly gooey. Then the pinch of salt and splash of vanilla balances all the flavors, to make this Rice Krispie treat recipe truly the best!
“I’m NEVER going back to the store bought version again! These homemade rice krispies treats were seriously the best we have ever had… So soft, chewy, and just perfect. I also loved that this recipe was so quick and easy to toss together. I added some rainbow sprinkles to the top of mine because why not?!” – Brittany, busy mom, chicken wrangler, and homesteader.

Ingredients Needed
You will need 5 simple ingredients: mini marshmallows, butter, Rice Krispie cereal, vanilla, and a pinch of salt. For the full ingredient amounts, scroll down to the printable recipe card.
Use fresh marshmallows for the softest, gooeyest Rice Krispie treats. Older ones don’t melt as smoothly and can make the bars rubbery. Fresh marshmallows also have better flavor and create that perfect melt-in-your-mouth texture.
How to Make Rice Krispie Treats
Making Rice Krispie treats is a super simple process with just 3 simple steps: melt, stir, and add to a pan. To make sure they turn out perfectly, I have included a quick step-by-step recipe overview with a few tips and tricks. Please scroll down to the printable recipe card for full instructions.
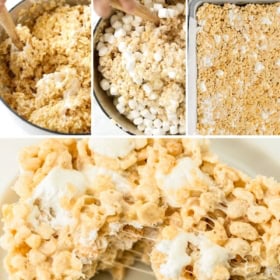
Start by lining the pan with parchment paper as this will help you to easily remove the rice krispie treats after they set up. However, if you make sure to heavily butter your pan, or spray it with non-stick spray, you can skip the parchment paper.


Once the marshmallows are melted, quickly stir in the cereal using a silicone spatula or wooden spoon. Fold gently and evenly to coat the cereal without crushing it, this preserves that signature light, crispy texture.


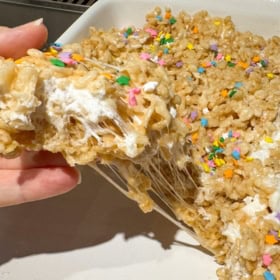
Before transferring the mixture to your pan, stir in the reserved whole marshmallows (if using) for those gooey pockets of softness. This is also the time to stir in any add-ins (like sprinkles, m&ms, chopped candy bars, etc).
I use a silicone spatula that’s been greased with butter (or sprayed with nonstick spray) to press the mixture into the pan. Don’t pack it down too firmly! Use a light, even pressure (just enough to level the top) will help the treats stay fluffy rather than dense.
Let the treats cool at room temperature until set, then slice them with a sharp knife for clean, bakery-style squares. You can also cut them into shapes with large cookie cutters.

Fun Variations To Try
- Different Cereals: You can use any cereal you like in this Rice Krispie treat recipe. Fruity Pebbles are one of my kids favorites, we also love Lucky Charms Rice Krispie Treats!
- Mix-Ins: Oreos, M&Ms, sprinkles, chopped candy bars, chocolate chips, toffee bits… the list could go on forever! There are so many ways to have fun with this recipe.
- Brown Butter: Want to take these to the next level? Learn how to brown butter before mixing it in! You could always use my brown butter rice krispie treats recipe to go that route.
- Peanut Butter: Fold in 2 cups peanut butter chips. Either melt them into the marshmallow mixture or stir them in with last bag of marshmallows. You can also drizzle some melted chips on top for a pretty final touch!
- Colors: You can use food dye to color the melted marshmallows however you’d like. Grab some colorful sprinkles and have fun! These are fun to dress up for just about any occasion.

Frequently Asked Questions
This likely means that you packed them too much into the pan or overcooked the marshmallow mixture. If you press down too much on the treats they will become very dense and hard. If you press lightly, just enough to get them into the pan, they will stay soft and fluffy!
Easy – just skip the salt and vanilla! Then all you need is butter, mini marshmallows, and cereal. However, the addition of a little salt and vanilla extract really makes the flavors pop!
Sadly no. The cereal is coated in malt flavoring, which is derived from barley and contains gluten.
Yes, you can use any size of marshmallows for the melted marshmallow mixture for the base of the treats. Keep in mind that they will take longer to melt. However, if you want to stir in the extra marshmallows at the end, you will need to use mini marshmallows only. I have tried using larger marshmallows and cutting them into a smaller bite-size, but I wound up with a big mess.
Yes, they are a great make-ahead dessert and stay fresh for a long time! When stored in an airtight container, they will stay fresh for up to a week.
Absolutely. Wrap them individually with plastic wrap (or separate them with wax paper) and then freeze them in a zip-top bag for up to 3 months. Let them thaw at room temperature before serving.
Best Rice Krispie Treat Recipe
Ingredients
- ¾ cup (1.5 sticks) unsalted butter
- 3 (10 oz) bags mini marshmallows
- 1 teaspoon pure vanilla extract
- pinch salt
- 10 cups crispy rice cereal
Want to save this recipe?
Instructions
- Grease a 9×13 casserole pan with butter, set aside.
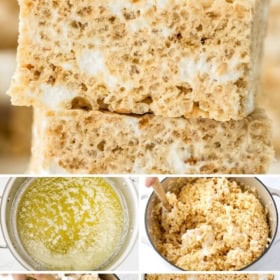
- In a large, light colored, heavy bottomed pot, like an enameled dutch oven, melt butter over medium heat. (If you want to brown your butter for a richer flavor, follow these directions before continuing on to step 3: How To Brown Butter)
- Once melted, add 2 bags of the marshmallows and stir until marshmallows are melted and the mixture is completely melted and smooth.
- Remove from heat, then immediately stir in the vanilla extract and salt. Fold in crispy rice cereal, moving quickly and then fold in remaining bag of mini marshmallows.
- Pour mixture into prepared pan. Using a buttered spatula, lightly press them into pan. Do not press them down too much, just spread them out. If you press them down too much they will become very dense and not as fluffy.
- Allow treats to rest for at least 1 hour at room temperature too cool. Slice into squares or cut into shapes and store any leftovers in an airtight container for up to a week.
⭐️ Tried this recipe? Leave a comment and rating! It only takes a minute and helps support our family-run blog. ❤️
Video
Nutrition
Categories:
More Easy No-Bake Desserts To Try
- If you love Reese’s cups, you’ll obsess over my easy chocolate peanut butter bars! Another chocolatey no-bake bar recipe I love are these nanaimo bars.
- Salty, sweet marshmallow popcorn balls are extra gooey and worth getting your fingers sticky for.
- My favorite is easy marshmallow dip is fun to serve with fruit dippers or pretzel sticks.
- Crunchy butterscotch haystacks are made with just 4 ingredients in 10 minutes!
Post may contain affiliate links. Read my disclosure policy.

I have NO WORDS for how good these are with the browned butter! Incredible.
If we want to add in a different cereal or Oreos would I use half the amount of rice cereal? If not how much of the other cereal would I use?
Hi Rachel! If you want to do half and half of two kinds of cereal, you can, you can also just replace a few cups worth. It’s up to you and how much you want of the other cereal. As for a mix in like crushed Oreos – they are forgiving enough for you to add in an extra cup of any kind of mix-ins while using the full amount of rice cereal. However, if you want them packed with Oreos, mix in two cups, skipping just one cup of the rice cereal. Hope this helps!
Hello. If I do not want to fold in the additional bag of marshmallows, should I still use the same amount of the other ingredients or do I need to adjust the amount of each ingredient?
Hi Heather! Everything stays the same, you use the first 2 of the bags of marshmallows to melt in the pot, then stir in the Rice Krispies, and finally stir in that last bag of mini marshmallows!
I just finished making these and can’t wait to dig in ! My whole house is excited for these rice crispy treats, haven’t made them in years. Nostalgia from mine and my childrens childhood.
I added mini chocolate chips to the top.. thanks for the great recipe!
The nutritional info is inaccurate.
Hi. If I use salted butter, should I omit the punch if salt?
Thanks,
Kathleen
Yes!
I added raspberry extract (instead of vanilla)and white choc chips. Yummy
Delicious!!! These are dangerous. I don’t think they will last 24 hours in the house, much less 4 days!
Just made these and they really are the BEST EVER! The extra butter and marshmallows make all the difference. So yummy!
What size is your pot. I’m looking to buy a dutch oven.
This one is a 6 quart!
So does this recipe call for 3 or 2 bags of marshmallows? The ingredients list 3, but the recipe directions say to melt 2 bags.
Hi Liz, the first two are melted and the third bag is folded into the cereal mixture in step 3.
These are absolutely amazing! I’m having one right now 🙂