

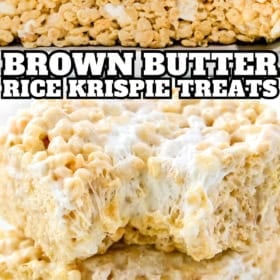
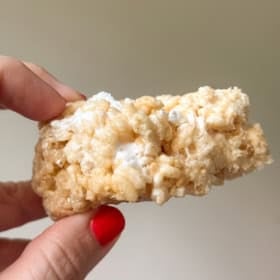
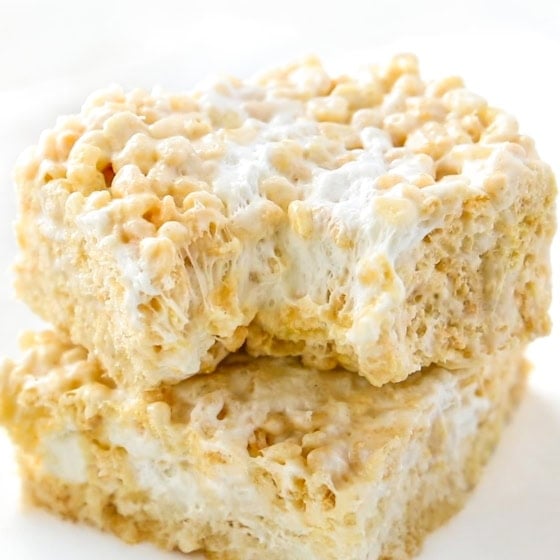
Take your favorite childhood classic to the next level with these Brown Butter Rice Krispie Treats! With a rich, nutty flavor and 3x the marshmallows, they are so gooey and irresistibly good.

Recipe Rundown: What To Know
- Flavorful: Rich and nutty with an almost caramel like taste.
- Soft and Gooey: Loaded with 3 bags of mini marshmallows!
- 5 Ingredients: Pantry staples with a sprinkle of salt.
- Portable: Throw them in a lunchbox or perfect for a bake sale.
- No-Bake: No need to turn on the oven, just melt and combine.
- Kid Friendly: They love both eating AND making these!
I took my best rice krispie treat recipe and upgraded them with browned butter. The addition of brown butter makes them taste almost nutty, adding an extra depth of flavor and complexity without needing any extra ingredients.
I have sent these Brown Butter Rice Krispie Treats in to my kid’s school and made them for countless bake sales, they are truly always a crowd favorite. Everyone always instantly says they are the BEST Rice Krispie Treats they have ever had. Just trust me and give them a try, you won’t regret it it!
“These really are the BEST Rice Krispie treats I’ve ever had. I’ll never make them without brown butter again. It adds an extra level of buttery warmth to the treats that takes them to a whole new level. Plus, there was the perfect amount of marshmallows and cereal to make each bite so gooey and chewy!” — Haley, busy mom of two and passionate home cook and baker.

Key Ingredient Notes
You will need 5 simple ingredients: mini marshmallows, butter, Rice Krispie cereal, vanilla extract, and a pinch of salt for balance. For the full ingredient amounts, scroll down to the printable recipe card.
For the softest, gooiest Rice Krispie treats, always use fresh marshmallows. Older ones don’t melt as well and can make the bars tough or rubbery. Fresh marshmallows melt smoothly, taste better, and give you that perfect melt-in-your-mouth texture.
Browning the butter makes a big difference in Rice Krispie treats because it adds layers of flavor that plain melted butter simply can’t provide. When you brown butter, you’re gently cooking the milk solids in the butter until they turn golden and develop a deep, nutty aroma.
Instead of just sweet and marshmallowy, the flavor of your marshmallow treats becomes more balanced, with a toasted, nutty and almost caramel-like flavor.

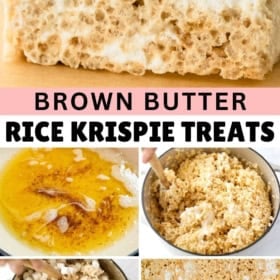
How To Make Brown Butter Rice Krispie Treats
Making Brown Butter Rice Krispie Treats is a super simple process with just 4 simple steps: brown the butter, melt in the marshmallows, stir in the cereal, and form into to a greased pan. To make sure they turn out perfectly, I have indulged a quick step-by-step recipe overview with a few tips and tricks. Please scroll down to the printable recipe card for full instructions.
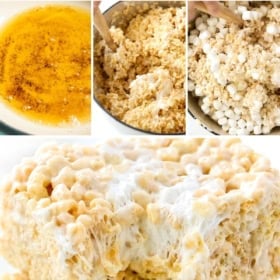
Start by browning the butter, carefully cooking it over medium heat until it foams, turns golden, and starts to smell nutty. Watch closely, as it can quickly go from brown to burnt. Follow my post for how to brown butter if it’s your first time!


Once the butter is browned, immediately stir in two bags of marshmallows. Melt them slowly, stirring constantly, to preserve a soft, gooey texture. Rushing this step over high heat can make the mixture stiff and your treats hard.


Once the marshmallows are fully melted, stir in the vanilla extract and salt. Quickly (but carefully!) fold in the rice cereal to coat every piece without crushing it. Then fold in the last bag of mini marshmallows.
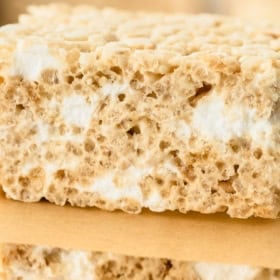
Immediately transfer the mixture into a greased pan. Don’t press down firmly, just lightly pat the mixture into an even layer with a greased spatula. This is super important to keep the texture soft, fluffy, and airy.
Let the treats set at room temperature until fully set, about an hour, then slice them into bars before serving. I always save a little in the pot so I can sneak a few bites while I wait. 😉

Frequently Asked Questions
Yes, you can use two bags for the base and skip mixing in the third bag if you prefer. The extra whole marshmallows add to the softness, but are optional!
You will want to use a 9×13 pan as this makes a large amount. If you want to halve the recipe, you can use an 8×8 or 9×9 pan instead to keep them thick.
This can happen for two possible reasons… #1 You over heated the marshmallows or used old/stale ones. Always melt the marshmallows slowly over low heat! #2 You pressed them too firmly into the pan, which condensed them down and made them dense/hard.
Absolutely! Stir in extras like mini chocolate chips, chopped nuts, candy bars, or sprinkles just after stirring in the last bag of mini marshmallows.
Yes, they are the perfect make-ahead dessert as they stay soft and chewy for days. I store them at room temperature in an airtight container. They will stay good for up to a week, if they last that long!
No, refrigeration can make them hard and dry. For best texture, store them at room temperature in a sealed air-tight container.
Brown Butter Rice Krispie Treats
Ingredients
- ¾ cup (1.5 sticks) unsalted butter
- 3 (10 oz) bags mini marshmallows, divided
- 1 teaspoon vanilla extract
- pinch of salt
- 10 cups crispy rice cereal
Want to save this recipe?
Instructions
- Grease a 9×13-inch casserole pan with butter, set aside.
- In a large, light colored, heavy bottomed pot (like an enameled dutch oven) melt butter over medium heat.
- Cook butter, stirring every few seconds, until butter turns a deep golden color and you see dark flecks. This whole process will take between 8 to 10 minutes if your heat is on medium. (If it's your first time, check out my how to brown butter post for help!)
- As soon as butter is browned, immediately add 2 bags of the marshmallows and stir until marshmallows are melted and mixture is completely melted and smooth.
- Remove from heat, then immediately stir in vanilla extract and salt. Fold in crispy rice cereal, moving quickly and then fold in remaining bag of mini marshmallows.
- Pour mixture into prepared pan. Using a buttered spatula, lightly press them into pan. Do not press them down too much, just spread them out. (If you press them down too much they will become very dense and not as fluffy.)
- Allow treats to rest for at least 1 hour at room temperature too cool. Slice into squares or cut into shapes and store any leftovers in an airtight container for up to a week.
⭐️ Tried this recipe? Leave a comment and rating! It only takes a minute and helps support our family-run blog. ❤️
Video
Nutrition
Categories:
More Of The Best No-Bake Dessert Recipes
- These extra-gooey marshmallow popcorn balls are a sweet and salty treat.
- My kids love finding lucky charms rice krispie treats in their lunch boxes.
- You only need 4 ingredients to make these no-bake butterscotch haystacks.
- Chocolate peanut butter bars have everything you love about a Reese’s cup in bar form!
- Another no-bake bar I’m obsessed with are these 3-layer nanaimo bars.
- Sweet, fluffy marshmallow fruit dip is fun to serve with fruit or pretzels.
Post may contain affiliate links. Read my disclosure policy.

I made these for my grand’s birthday last year….and they have been requested for this year’s party!!! Delicious And addictive!!!!
So gooey and addicting we loved these
Do u make sugar free desserts
Hi Barb, no I do not. I’m sorry!