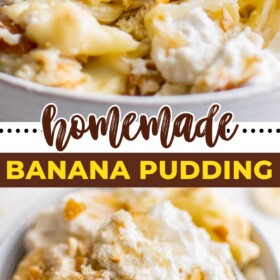
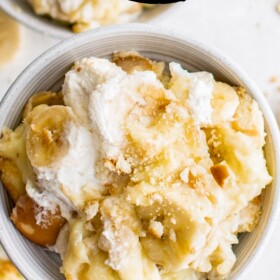
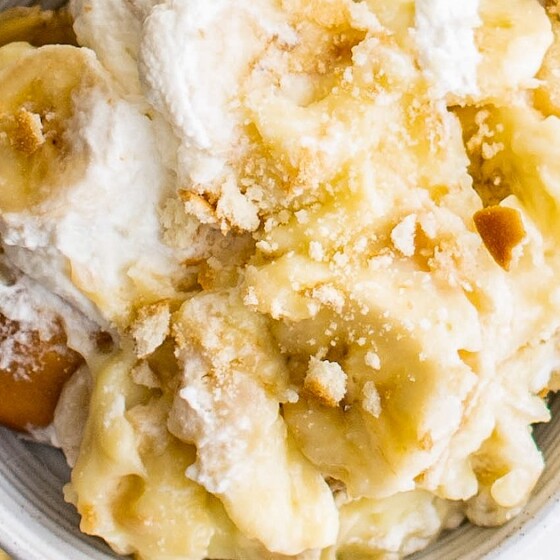
Creamy, decadent, Homemade Banana Pudding features layers of from-scratch vanilla pudding, vanilla wafers, and bananas, all topped with sweet homemade whipped cream. This recipe is easier than you think – the hardest part is waiting for it to chill!

This Might Just Be the South’s Favorite Treat!
If you take a look at my dessert recipes, you’ll find quite a few different spins on classic banana pudding, from Banana Pudding Cheesecake to Banana Pudding Bars to Banana Pudding Lasagna. There’s nothing quite like the combination of sweet sliced bananas with cookies and vanilla pudding. And in the South, banana pudding is basically a must-have for any potluck and most holiday meals.
One thing I haven’t posted yet is a simple, homemade banana pudding recipe from scratch, so that’s what this post is all about. The only part that’s not from scratch would be the Nilla Wafers. They’re just so good and are the perfect base for banana pudding!
Looking for an easy banana pudding using boxed instant pudding? Try my mama’s recipe for Easy Banana Pudding!

How Is Pudding Made from Scratch?
Boxed pudding mixes are made with some complicated-sounding ingredients, but that doesn’t mean this beloved dessert is difficult to make. The homemade version is basically milk, sweetened with sugar and thickened with cornstarch or egg yolks. My easy version uses both milk and cream, as well as cornstarch, for a no-fail pudding with a wonderful, silky-smooth texture.

The Ingredients You’ll Need
You’ll need ingredients to make the banana pudding itself, with the cookies and bananas added to it, and then you’ll also need ingredients to make homemade whipped cream topping. Let’s take a closer look:
Banana Pudding
- Milk and Heavy Cream: I use mostly whole milk in this pudding, but with some heavy cream mixed in for extra richness. It’s a little less rich than half-and-half, because I use more milk than cream. If you want, you can use just milk, or half-and-half for an even more decadent dessert.
- Sugar: Regular granulated sugar is fine. You could also use raw sugar, or even light brown sugar.
- Vanilla: Pure vanilla extract gives a classic vanilla flavor, while vanilla bean paste could also be used, to add an even more intense taste and pretty vanilla flecks.
- Salt
- Cornstarch: Cornstarch gives the pudding its silky consistency and makes it set into, well, pudding!
- Vanilla Wafers: The Nilla Wafers brand is probably the most famous, but any brand is fine.
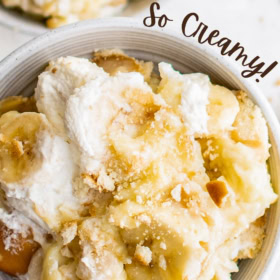
- Bananas: Sliced somewhat thinly, as shown in the recipe photos.
Whipped Cream Topping
- Heavy Cream: It’s important to use heavy whipping cream, or the topping won’t be fluffy and set.
- Powdered Sugar: Powdered sugar is my favorite for making whipped cream, because it dissolves really easily and won’t leave grains or droplets in the whipped cream.
- Vanilla: You can leave this out if you prefer, but it adds a nice, bakery-style touch.

Let’s Make Homemade Banana Pudding!
First, you’ll want to make the pudding mixture. Then comes the fun part – assembling your homemade banana pudding. I like to make mine in a glass trifle dish.


- Make the Pudding. To make homemade vanilla pudding, just whisk the ingredients (milk, heavy cream, granulated sugar, vanilla, salt and cornstarch) in a heavy saucepan. Let the mixture cook over medium heat for a few minutes, whisking now and then, until it thickens.


- Cool the Pudding. Set the thickened pudding mixture aside to cool for half an hour or so.
- Make the Pudding Layers. Get out your baking dish or trifle dish. Spread a layer of pudding in the bottom, followed by a layer of wafers, and then a layer of bananas. Keep adding layers until the dish is full, with a top layer of bananas. I fit a total of four sets of layers in my trifle dish.


- Add the Topping to the Banana Pudding. Use a spatula to dollop the whipped cream on top of your banana pudding, and spread it out evenly.


- Chill. Cover the dish with plastic wrap, and store in the refrigerator for about 2 hours to set and let the flavors meld. The cookies will soften just a bit as well, which gives the dessert the perfect texture.
- Enjoy! When you’re ready to serve, top the pudding with additional sliced bananas and crushed vanilla wafers, if desired, or just serve it as-is.

What Can You Put in Bananas to Keep Them from Turning Brown in Banana Pudding?
The surest way to keep bananas in banana pudding from discoloring is to fully cover them with the pudding mixture. Coating them in pudding keeps the air out, which keeps the bananas from oxidizing.
However, if you want to arrange the banana slices in such a way that they might be exposed to air, you can use the lemon juice trick to help keep them from discoloring. Just slice your bananas, and then lightly toss the slices with a tiny bit of lemon juice (or lime juice, or even pineapple juice). The lemon flavor will be minimal, and the bananas will keep their creamy color longer.

Recipe Notes
While I love this recipe as written, you should definitely feel free to play around with it and make it your own. There are all kinds of ways to tweak this recipe and make substitutions – here are just a few!
- Cool Whip: If you prefer Cool Whip topping on your banana pudding, no judgment here! Just skip the whipped cream step, and top your pudding with Cool Whip. It helps to thaw it out a little for easy spreading.
- Go Bananas! If you want banana flavoring in the pudding itself, rather than plain vanilla pudding, I recommend adding about half a teaspoon of banana extract to the pudding while it cools.
- Cookie Options: Nilla Wafers are what most banana pudding recipes usually call for, but another popular cookie option are Pepperidge Farm Chessmen Cookies. These are more buttery and a little heavier than Nilla Wafers, but both options are totally delicious.

How to Store Leftover Banana Pudding
This homemade banana pudding can be stored in an airtight container in the fridge for 2 to 3 days. You could also store it in the serving dish, tightly covered with plastic wrap or press-n-seal. It’s perfect for a cold, sweet snack.

Can I Freeze This?
Technically, this dish should freeze okay for about three months, tightly wrapped or placed in airtight containers, but the cookies may become somewhat soggy if you do. I think this dish is best enjoyed fresh, but feel free to try the freezer if you want to save your leftovers for longer!
More Dreamy Banana Desserts
- Pineapple Banana Bread
- Banana Cream Cheese Muffins
- Bananas Foster Cheesecake
- Banana Bundt Cake
- Best Banana Muffins
- Brown Sugar Banana Bread
- Best Banana Cake
Homemade Banana Pudding
Ingredients
Banana Pudding:
- 3 cups whole milk
- 1 ½ cups heavy cream
- 5 egg yolks
- 1 cup granulated sugar
- 1 tablespoon vanilla extract
- ¼ teaspoon salt
- ¼ cup cornstarch
- 1 11-oz box vanilla wafers
- 3 bananas, sliced
Whipped Cream Topping:
- 1 ⅓ cups heavy cream
- ¼ cup powdered sugar
- 1 teaspoon vanilla extract
Want to save this recipe?
Instructions
- In a medium saucepan, whisk together the milk, heavy cream, egg yolks, granulated sugar, vanilla, salt and cornstarch.
- Cook over medium heat, whisking occasionally, until the mixture comes to a simmer and thickens, about 5 minutes. Once thickened, remove from the heat and set aside to cool for 30 minutes.
- In a trifle dish, glass serving bowl or casserole dish, spread a layer of pudding in the bottom of the dish, followed with a layer of wafers, and a layer of bananas. Repeat this process 3 more times until there is a final layer of banana on top and set aside.
- In a small bowl, whip the heavy cream, powdered sugar and vanilla together until light and fluffy.
- Add the whipped topping on top of the banana pudding and spread evenly with a spatula. Cover the dish with plastic wrap and place it in the refrigerator for 2 hours.
- When ready to serve, top with additional sliced bananas and crushed vanilla wafer, if desired.
⭐️ Tried this recipe? Leave a comment and rating! It only takes a minute and helps support our family-run blog. ❤️
Notes
- Cool Whip: If you prefer Cool Whip topping on your banana pudding, no judgment here! Just skip the whipped cream step, and top with Cool Whip. It helps to thaw it out a little for easy spreading.
- Go Bananas! If you want banana flavoring in the pudding itself, rather than plain vanilla pudding, I recommend adding about half a teaspoon of banana extract to the pudding while it cools.
- Cookie Options: Nilla Wafers are what most banana pudding recipes usually call for, but another popular cookie option are Pepperidge Farm Chessmen Cookies. These are more buttery and a little heavier than Nilla Wafers, but both options are totally delicious.
- Storage: This homemade banana pudding can be stored in an airtight container in the fridge for 2 to 3 days. You could also store it in the serving dish, tightly covered with plastic wrap or press-n-seal. It’s perfect for a cold, sweet snack.
Nutrition
Categories:
Post may contain affiliate links. Read my disclosure policy.
