
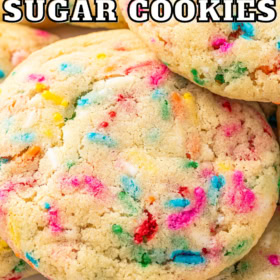


These colorful Funfetti Cookies are super soft, chewy and extra easy to make with simple ingredients. One cheerful sprinkle cookie just isn’t enough!

Soft Sugar Cookies with Colorful Sprinkles!
If you’re kids are anything like mine, they absolutely love any dessert with sprinkles, but especially cookies! With a simple and easy cookie recipe, these funfetti cookies are perfectly soft and full of delicious sugar cookie flavor. There’s just something about the bright, colorful sprinkles and buttery sugar cookie dough that instantly puts me in a good mood.
This recipe has been in constant rotation in our house for the past 10+ years and are a family favorite. My kids still beg for one in their lunch box every week! With just a few simple ingredients, these cookies come together quickly and easily. You can even freeze the dough for a quick cookie fix whenever the craving strikes!

Why Is It Called Funfetti?
Funfetti was originally invented by the Pillsbury company. They combined plain vanilla cake mix with rainbow confetti sprinkles that went in the cake, not just on it. The result? A soft, white cake with bright dots of blue, pink, green, and yellow. So fun! And what do you get when you combine confetti sprinkles and fun? You get funfetti, my friend.

What You’ll Need
So what do you need to make funfetti cookies from scratch? It’s basically a soft sugar cookie dough plus the right kind of sprinkles. Here’s the list of ingredients – for exact quantities, be sure to scroll all the way down to the recipe card at the bottom of this post.
- Flour: All-purpose flour is my go-to for all forms of baking, as the results are the most consistent.
- Cream of Tartar: For a soft texture, your sugar cookie dough absolutely needs cream of tartar! This is what gives these cookies their distinctive texture.
- Rising Agents: This recipe uses both baking powder and baking soda for lift and lightness.
- Butter: Unsalted butter, brought to room temperature. This way it’s easier to cream with the sugar.
- Sugar: Regular granulated sugar is fine.
- Vanilla Extract: For the most natural flavor, make sure to use pure vanilla extract and not the synthetic kind.
- Sprinkles: Rainbow sprinkles, or any color sprinkles you like. I personally like to use the long buttercream style sprinkles versus the small non-peril style. They make an overall softer cookie.
- Egg: To help bind the dough together and add structure.
- Salt

Let’s Make a Batch of Funfetti Cookies!
One of my favorite things about this recipe is that, unlike many cookie recipes, this one doesn’t call for chilling the dough. That makes it extra quick and simple! Here’s how to make it:
- Mix the Dry Ingredients and Wet Ingredients Separately. Combine the flour and dry ingredients in a separate bowl, and beat together the butter, sugar, egg, and vanilla in a stand mixer.


- Combine the Wet and Dry Ingredients, and then add Sprinkles. Gradually add in the flour mixture until the batter forms, then stir in the sprinkles.


- Roll the Dough. Roll the sugar cookie dough into equal-sized balls, I use a medium sized cookie scoop, and place these onto a lined baking sheet. Don’t forget to leave a little space for the cookies to expand!
- Bake. Bake the cookies in a 350°F oven until they’re set in the middle. They may not look quite done, but that’s okay – they’ll finish cooking while they cool off.


Can I Make the Dough Ahead of Time?
Yes! If you’d like to keep a batch of this dough in your fridge or freezer (and who wouldn’t?) you can definitely make this in advance. If you’re refrigerating your dough, just make it and roll it into balls, and store them in the fridge. They’ll keep for up to two days.
If you want to freeze the dough for longer-term storage, roll the dough balls out onto a baking sheet and then place them in the freezer until frozen solid. At that point, transfer the balls to a freezer bag and stash them in your freezer for up to three months. You can bake them directly from frozen, adding an extra minute or two or three so that they bake through.

Baker’s Notes
Even a recipe as simple as this one can be improved with a little inside info. Here’s what you need to know in order to make the best funfetti cookies ever.
- What Kind of Sprinkles to Use? For best results, you’ll want to use “jimmies,” which are the little oblong sprinkles, or rainbow candy “quins,” which are the little flat circles. These won’t bleed their color as much while being mixed and baked. Avoid round sprinkles (AKA “nonpareils”) if you want your cookies to stay soft.
- Add the Sprinkles at the End: Make sure to wait until you’ve got the dough well-mixed before adding the sprinkles. This will help ensure that your sprinkles don’t break or bleed and spoil the look of the funfetti.
- Room Temperature: I noted this about the butter, but you can also let the eggs reach room temperature to ensure that everything mixes and bakes evenly.
- Don’t Overbake the Cookies: The centers of the funfetti cookies will be set when you take them out of the oven, but overall, the cookies should look soft and almost underbaked. As the cookies cool, they will firm up. If the centers are already firm when they leave the oven, this will result in over-baked cookies that will be crunchy instead.
- Store with a Slice of Bread: When storing baked goods that you want to stay soft/chewy, store them in an airtight container with a slice of white bread. The baked goods will use the moisture from the bread to stay soft, chewy and moist. Check on the slice of bread every couple of days and replace it when it goes stale. This trick will actually make these cookies even softer and chewier on day 2!

Storing and Freezing Funfetti Cookies
How long do funfetti cookies last? Well, that depends on how you store them. I recommend storing them at room temperature in an airtight container, for up to 5 days. Store them with a slice of white bread to keep the cookies soft and chewy. Replace the slice of bread every couple of days as it goes stale.
For freezing, pre-freeze the cookies on a baking sheet until frozen solid, and place them into a freezer bag. They’ll keep for up to three months. To serve, just thaw them out and enjoy!
More Fabulous Sugar Cookie Recipes
- Lofthouse Cookies
- Soft Maple Sugar Cookies
- Cherry Almond Sugar Cookies
- Chocolate Sugar Cookies
- Marbled Sugar Cookies
- Frosted Sugar Cookie Bars
- Cake Mix Cookie Bars

Funfetti Sprinkles Sugar Cookies
Ingredients
- 1 ½ cups all-purpose flour
- 1 teaspoon cream of tartar
- 1 teaspoon baking powder
- ½ teaspoon baking soda
- ¼ teaspoon salt
- ½ cup (1 stick) unsalted butter, room temperature
- ¾ cup granulated sugar
- 1 large egg
- 2 teaspoons vanilla extract
- ¾ cup rainbow sprinkles
Want to save this recipe?
Instructions
- Preheat oven to 350°F. Line two baking sheets with parchment paper or silicone baking mats. Set aside.
- In a medium bowl, whisk together flour, cream of tartar, baking powder, baking soda and salt. Set aside.
- In a stand mixer, beat butter and sugar until light and fluffy. Add egg and vanilla extract, mixing until combined. Add flour mixture 1/2 cup at a time, mixing until completely combined. Stir in sprinkles until evenly distributed (you can do this by hand or with the stand mixer).
- Roll one heaping tablespoon of dough into balls (I use a medium cookie scoop) and place on prepared baking sheet – leaving about an inch for spreading.
- Bake for 8-10 minutes, until the centers are set. The cookies will not look browned or cooked, but they are (they will finish cooking while cooling on cookie sheet).
- Remove from oven and let cookies rest on baking sheet for 5 minutes. Then transfer to a wire rack to cool completely. Store in an airtight container for up to 5 days.
⭐️ Tried this recipe? Leave a comment and rating! It only takes a minute and helps support our family-run blog. ❤️
Notes
Nutrition
Categories:
Post may contain affiliate links. Read my disclosure policy.

If you’re baking these in hot/humid weather, you’re going to want to make sure you refrigerate them. I don’t have a/c at my house and tried them and they spread way too much. The second batch was refrigerated and it worked much better. Just FYI, so no one else makes the same mistake I did.
These look great, sugar cookies are big in our house. Love that we can change sprinkle colors to make them go better with holidays too.
These look UNREAL. Cannot wait to try them… yummm
These look so perfect! Printing out immediately…
Ia there anything and can sub for the 1 teaspoon cream of tartar. I have none on hand and.the only.store i can get it at is quite far.
The cream of tartar is pretty important to the overall texture of the cookie. I really wouldn’t recommend leaving it out if you want soft cookies.
They sell Cream of Tartar even at CVS! Hope you get to make them!
Oh, yum 🙂 I love soft sugary cookies! These look delightful!
Glad to hear your surgery went well! The cookies look amazing! Perfectly soft to enjoy while you are still recovering 🙂
Made these but they cracked on top. That said I may not been paying attention when making them and added the baking soda twice? I’m almost afraid to eat them until my taste tester gets home. 😉 but they do look yummy.
Jessica, I just made these and they’re incredible! Totally couldn’t help myself. I’m going to (TRY to) give a large portion of them to friends but no promises… Amazing recipe! Do you mind if I blog about them on Monday (with credit to you & Sally)?
These make me so happy!!! Yay for colors and sprinkles! So glad that surgery went well too. These look like just what the doctor ordered… 😉
Made these last night and they turned out great. They would be great for birthday cookies. Thanks for sharing!
These are gorgeous! Hope you’re feeling better 🙂
Oh! These are SO getting pinned! Amazing looking cookies, Jessica. They call out to my inner 10 year old! Thanks for sharing and hope you’re continuing on the mend!
These look amazing! This is one great way to celebrate surgery recovery1
Yummy! I think post-op cookies might be extra special delicious. It really would have been a great excuse to get someone else to make them for you, though.
when do you add the sprinkles?
Leave it to me to forget one of the most important parts! 🙂
I have updated the recipe above, but you just stir them into the dough before baking!
These look like they’d taste just like the Lofthouse cookies, but without all the pricey additives… Great!
Made these yesterday afternoon on a whim. I used up all the sprinkles in my house, but it was for a good cause! These came out perfectly (they made 18 thick, soft & chewy cookies for me) and looked too cute to eat. But, we got over that pretty quickly. Thanks so much!
you are hilarious…. and I’m SO glad you survived and are feeling better!!!! Oh, and these cookies?? I am now convinced I need to make them for breakfast… YUM!
The cookies look great! Get well soon 🙂