These easy Mexican Bolillos are a staple in Mexican cuisine, and with good reason! They’re a fun-to-make, versatile bread roll with a baguette-like texture. Try them, and you’ll love them!

Mexico’s Favorite Bread Roll: The Bolillo!
Have you ever eaten a bolillo? If you love Mexican food, then this is probably high on your list of favorites. Bolillos are eaten in Mexico with just about everything, whether to soak up the savory sauces in a main dish, or as the bread for a “torta” (lunchtime sandwich). Bolillos even make a great breakfast with a cup of strong cup of coffee or a Cafe Con Leche!
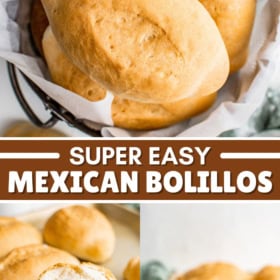
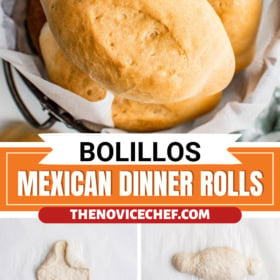
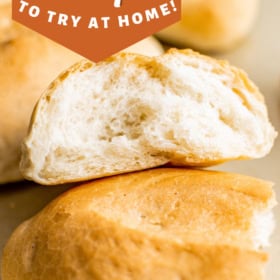
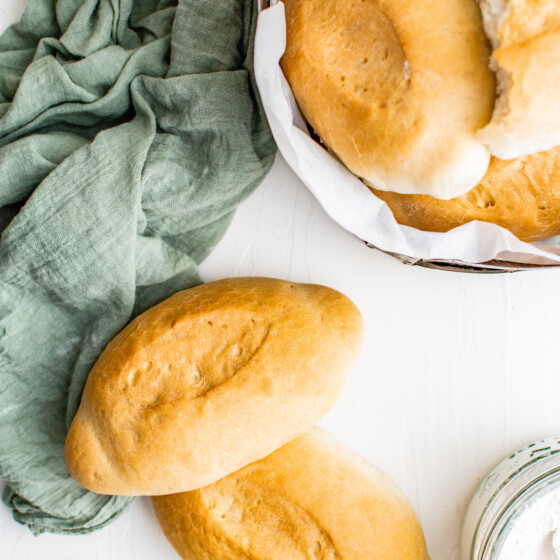
So what exactly is a bolillo? It’s essentially a cousin of the baguette. Bolillos are small, single-serving white bread rolls, soft on the inside and satisfyingly chewy on the outside. They’re super versatile, addictively delicious, and surprisingly simple to make! This recipe will show you how.
How Do You Pronounce Bolillos?
You might be wondering just how to pronounce “bolillo,” if you haven’t had these before! Well, “bolillo” is a Spanish word, so the double-l is pronounced roughly like an English “y.” Basically, the pronunciation should be “bo-li-yos.”

What is Bolillo Bread Made Of?
This beloved staple bread, like many famous recipes, is made with only the simplest ingredients. You probably already have them in your pantry and fridge! Let’s take a closer look.
- Water: The water should be warm to the touch, but not hot. About body temperature, or slightly warmer, is fine. If the water is hot, it will kill the year instead of activating it.
- Sugar: A small amount of granulated sugar adds a touch of sweetness and helps to feed the yeast.
- Yeast: I use active dry yeast in this recipe.
- Flour: All-purpose flour is great. You could also use bread flour, but you may need to add a little bit of additional water to keep the dough soft.
- Oil: Vegetable oil is fine, or you can substitute your favorite oil.
- Salt

How to Make Bolillos
Okay, let’s talk about the baking method! This is a typical baking technique, one that you’re probably familiar with if you enjoy baking your own bread and rolls. We’ll be mixing up a simple dough, and giving it two rises: shaped, and unshaped. From there, the bolillos go into the oven. Easy!


Making the Dough and the First Rise
- Proof the Yeast. To make the dough, you’ll first need to proof the yeast. Combine the yeast in a large bowl with the water and the sugar, stirring to dissolve. Let this sit for 5 minutes, until frothy. If it doesn’t get frothy, the yeast is old, and you’ll need to start again with new yeast.
- Make the Dough. To the frothy yeast mixture, add your flour, oil, and salt. Stir with a large spoon until it begins to come together, and then knead the dough, either in a stand mixer with a bread hook attachment, or by hand. Note: this is a very sticky dough, so I do not recommend kneading by hand. If you do, resist the temptation to add more flour, or your bolillos will be stiff!
- Let the Dough Rise. Turn the dough out onto a floured surface. Dust your hands with flour, and knead the dough a little bit, just until all of the corners are tucked in and it forms a ball. Then transfer the dough to a bowl greased with cooking spray (or butter, or oil), and cover the bowl with a clean tea towel or plastic wrap. Let the dough rise for an hour or two, until it’s doubled in size.


Shape the Bolillos and The Second Rise
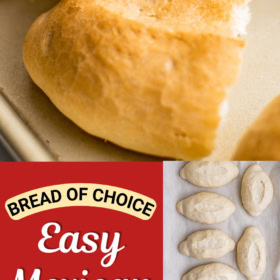
- Shape the Bolillos. Once the dough has risen the first time, you’ll need to shape the bolillos. Line a baking sheet with parchment paper, and set it aside. Next, drizzle a little oil onto your clean countertop, and oil your hands as well. Turn the risen dough out onto the counter, and cut it into 8 equal pieces. Shape each piece into a ball, and then flatten each ball into a square shape. Fold the bolillo corners in so that they meet in the middle. Finally, start rolling up one side to meet the other, pinching the edges together, and pressing at the ends to make little balls or knobs.
- Second Rise. Lay the shaped bolillos on your prepared baking sheet, leaving plenty of room between them so that they can spread and rise. Mist with cooking spray, cover with a tea towel, and let them rise for 20 – 30 minutes. Then use a sharp, serrated knife to slash the tos of the bolillos, scoring a line down the center. Let them continue to rise until they have finished doubling in size.


Baking the Bolillos
- Bake. Ten minutes before you’re ready to bake the bolillos, preheat your oven to 425°F. Arrange a baking pan (a 9×13 inch metal pan works well) in the bottom of the oven. Once the oven has preheated, pour about three cups of water into that pan, and move the baking sheet with the bolillos to the upper rack. Bake for about 10 minutes, and then reduce the heat to 400°F and bake for about 10 minutes more.
- Cool and Serve. Once the bolillos have turned a light golden color, with a good crust, take them out of the oven and let them cool for 5 – 10 minutes before serving.


Helpful Tips
Want to know more about baking your own bolillos? Great! Here are my top three tips for making the perfect Mexican bolillos, every time.
- Understanding Rise Times: Have you ever noticed that sometimes your yeasted doughs rise much more quickly, and sometimes they take longer? The reason is that yeast is a living organism, and how quickly it acts depends on how warm your kitchen is, how fresh the yeast is, how humid the air is, and more! So your dough may take longer or shorter to rise. Just keep an eye on it!
- Understanding Dough Volume: While most recipes call for letting the dough rise until “doubled,” that’s a loose term. Experienced bakers generally can tell when the dough is ready, but if you aren’t sure, try the “press test.” Press gently into the dough with one finger, about half an inch in. If the dough slowly rises back up where you pressed it, it’s not done rising yet. If the indentation remains, then the dough is done rising.
- Water, Water, Everywhere! Make sure to include the pan of water in the bottom of the oven for this recipe—it’s essential for getting that delicious crust. If you want the bread to be even more crusty, spritz the bolillos with a light misting of water right before baking.

What to Eat with Bolillos
These are so versatile! You can serve bolillos toasted with butter, as a snack with coffee or milk, or use them as a refreshingly different sandwich roll. Want something more substantial? Then how about…
- Saucy Chicken: Mexican Chicken Adobo is the perfect kind of saucy chicken dish to serve with bolillos!
- Favorite Soup: Serve up a bowl of Black Bean Soup with bolillos for an easy, heartwarming dinner. Yum! They also go perfectly with this Slow Cooker Ham & Bean Soup.
- Carnitas: They’re not just for tortillas! Hollow out your bolillos, and pile them high with Crispy Pork Carnitas and Corn Salsa. Seriously satisfying!
- Torta: You can use them to make any flavor of torta you would enjoy!
Storing the Leftovers
Fresh, homemade bread is tricky to store without it drying out or going stale, but these guidelines will help it stay soft and delicious as long as possible!
- Cool: Make sure that your bolillos are cooled down completely before storing.
- Cover: Cover the bolillos fully! Air will dry them out, so wrapping each one in plastic wrap or putting them in zip-top bags, and pressing out all the air before sealing, is recommended.
- Store: For the best results, store your bolillos at room temperature. You can reheat them in the oven to freshen them up a little bit before serving. They should last up to seven days.
Can I Freeze These?
Yes, you can! Wrapped tightly and store in a large storage bag, bolillos can be frozen for up to three months. Thaw in the refrigerator before reheating.

More Easy Bread Recipes
Looking for some more delicious bread recipes? Here are a few of my favorites, both savory and sweet bread recipes:
- Homemade Flour Tortillas
- Easy Homemade Bread Recipe
- Brown Sugar Banana Bread
- Homemade Pita Bread
- Best Pumpkin Bread
- Best Beer Bread
- Easy Cinnamon Bread
- Irish Soda Bread
- Jalapeño Sweet Corn Muffins
- Goat Cheese Garlic Bread
Easy Mexican Bolillos
Ingredients
- 1 ½ cups warm water
- 2 tablespoons granulated sugar
- 1 tablespoon active dry yeast
- 4 cups all-purpose flour
- 2 tablespoons vegetable oil
- 1 tablespoon salt
Want to save this recipe?
Instructions
- In a large bowl, combine the water and sugar. Stir to dissolve. Add the yeast, and allow it to activate for 5 minutes, or until frothy.
- Add the flour, vegetable oil, and salt. Stir to combine. Using a stand mixer fitted with the bread hook attachment, knead the dough for 15 minutes. (This is a very sticky dough, so I do not recommend kneading by hand, or you may be tempted to add more flour which will make the bolillos stiff.)
- Dust a countertop with some flour and then turn the dough out onto the floured surface. Dust your hands with flour, and knead the dough, just until all of the corners are tucked in and it forms a ball.
- Grease a large bowl with nonstick spray, and add the dough to the bowl. Spray the top of the dough with nonstick spray as well. Cover the bowl with a clean kitchen towel or plastic wrap, and let it rise in a warm spot for 1 – 2 hours, or until the dough has doubled in size.
- Line a baking sheet with parchment paper, and set aside. Lightly drizzle a countertop with vegetable oil, and oil your hands as well. Drop the dough onto the counter, and cut it into 8 equal pieces.
- Form each piece of dough into a ball. Take one of the dough balls, and flatten it into a small square. Fold in each corner so that the corners meet in the middle.
- Start rolling up one side to meet the other, and then pinch the edges together as you gently roll the dough, pressing slightly above the ends of the dough to form little balls or “knobs” at the end. Place the bolillos on the prepared baking sheet. (You can see step-by-step photos of this process in the post above.)
- Repeat this process with the remaining balls of dough. As you place them on the baking sheet, make sure to leave room for them to rise and spread out over time. You may need to use two baking sheets.
- Spray the tops of the bolillos with nonstick spray, cover them with a clean kitchen towel or tea towel, and let them rise for 20 – 30 minutes, until the dough has risen a bit.
- Using a very sharp knife (I like to use a serrated knife to cut dough), gently slice the tops of the bolillos down the center. Let them continue to rise, until they have doubled in size from the original size when you shaped them.
- Ten minutes before you’re ready to bake them, preheat your oven to 425°F and place another baking pan (such as a 9×13 cake pan) into the bottom of the oven.
- When ready to bake, pour 3 cups of water into the pan in the bottom of the oven. Place the sheet pan with the bolillos on the rack above, and bake for 10 minutes. Reduce the heat to 400°F, and bake for another 10 – 15 minutes, or until the tops and sides of the bolillos have turned a light golden color, and they have developed a nice crust.
- Let the bolillos cool for 5 – 10 minutes before serving.
⭐️ Tried this recipe? Leave a comment and rating! It only takes a minute and helps support our family-run blog. ❤️
Notes
Storing the Leftovers
- Cool: Make sure that your bolillos are cooled down completely before storing.
- Cover: Cover the bolillos fully! Air will dry them out, so wrapping each one in plastic wrap or putting them in zip-top bags, and pressing out all the air before sealing, is recommended.
- Store: For the best results, store your bolillos at room temperature. You can reheat them in the oven to freshen them up a little bit before serving. They should last up to seven days.
Can I Freeze These?
- Wrapped tightly and store in a large storage bag, bolillos can be frozen for up to three months. Thaw in the refrigerator before reheating.
Nutrition
Post may contain affiliate links.

I’m wondering just how traditional bolillos can be. From all the recipes I have found on the internet they seem to have begun with the invention of the stand mixer. I have found no-knead overnight rise recipes for many of the breads I regularly bake, but none for bolillos. I guess I’m going to have to experiment as arthritic fingers prevent me from kneading.
These are absolutely delicious! I made a batch and added some jalapeños mixed with cream cheese before rolling and we just inhaled them! I’m getting ready to make a second batch. The flavor and texture of the bread is better than many many other recipes I have tried over the years. Thank you for sharing!
So glad you enjoyed them KT!
The ingredient list says 4 cups flour divided. Step 2 says add the flour. How much? It never tells you how to divide the flour. Thank you.
Hi KT! Thanks for catching that! I originally divided the flour, but then tested them again and didn’t need to. So that was an error! You do not need to divide the flour, I’m sorry for the confusion and the recipe has been updated!