

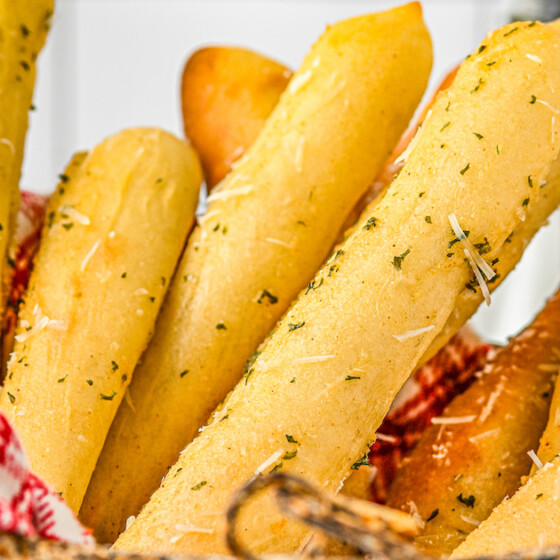
These golden-brown, homemade breadsticks are baked until perfectly soft and tender and then brushed with an herbed garlic butter! Move over Olive Garden, this breadstick recipe is the best!

What You’ll Love About This Homemade Breadstick Recipe
I’m sure you will adore these perfect buttery and soft breadsticks – they’re just *so* good. Here’s why:
- Flavorful: There’s basically nothing as good as bread right out of the oven! Bite into one of these perfectly-seasoned, garlic butter and Parmesan-sprinkled topped breadsticks, and I’m sure you’ll agree!
- Perfect Texture: These have the perfect balance between a soft, tender crumb and a satisfyingly crisp crust.
- Great with Everything: Serve these up with any dish, from a bowl of cozy soup to a fresh salad to your favorite cheesy pizza or pasta.
- Fun and Easy: Whether you’re a seasoned baker or just getting started, you’ll love this easy, fun recipe. Get the kids involved, they will love helping to roll and shape the dough!
Need more bread recipes like this? Be sure to try these homemade soft pretzels, and these decadent homemade garlic knots too!

The Ingredients You’ll Need
A few basic baking ingredients are all you’ll need to get these breadsticks on your table. For full ingredient amounts and directions, scroll to the printable recipe card at the bottom of this post.
Breadsticks
- Water: Warm water, to dissolve and activate the yeast.
- Yeast: Look for active dry yeast.
- Sugar: A little granulated sugar helps “feed” the yeast and make the bread rise.
- Olive Oil: Or another neutral oil of your choice – avocado oil works nicely, too.
- Flour: You’ll want half all-purpose flour and half bread flour for the best texture.
- Salt
Garlic Topping
- Butter: Melted.
- Seasonings: You’ll need garlic powder, salt, and Italian seasoning.
- Parmesan: Grated or shredded parmesan cheese.

How to Make Breadsticks
This process is a classic: knead, rise, shape, rise again, and bake. The double rising time helps to create that soft, chewy interior.


- Make the Dough: I use a stand mixer to proof the yeast, and then knead the rest of the ingredients together into a sticky dough.
- First Rise: Place the dough ball into a greased bowl, cover it, and let it rise in a warm place until doubled in size.
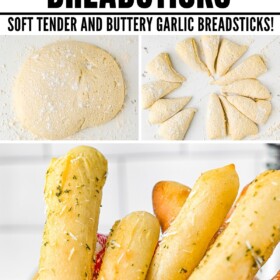
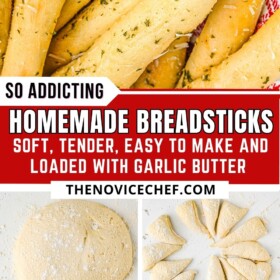
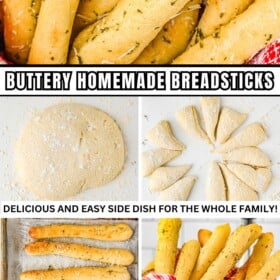
- Shape: Turn out the dough, cut it into twelve slices like a pizza, and roll the slices into long ropes.
- Rise and Bake: Let the ropes rise until puffy, and then bake them in a hot oven until done.
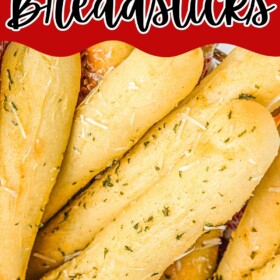
- Enjoy: Spread the garlic butter topping all over your fresh and warm breadsticks, sprinkle on some Parmesan, and serve warm!

Tips for Success
Here are the most important things I’ve learned about making homemade breadsticks.
- Water Temperature: Whenever you’re working with yeast, you want to dissolve it in warm, but not hot, liquid. Hot liquid will kill the yeast, while cold water won’t activate it. Use water that’s just a little bit warmer than body temperature, around 105°F to 110°F.
- Keading: While the kneaded dough will be fairly sticky, it should also be smooth and elastic. If it’s shaggy or fragile, it should be kneaded more.
- Rising: Let the dough rise in a warm, draft-free area to ensure a good rise. Some people like to rise their dough in the oven with the light on, if it’s cold in the kitchen. Another common spot is in the microwave, with a bowl of steamy hot water for some warmth. However, if you live in a warm area (hello, Florida!), the counter is probably just fine.
- Flavoring: For me, melted butter with garlic and Italian herbs is just the right flavor profile, but you don’t have to stop there! You can experiment with all of your favorite herbs and spices for a variety of breadstick flavors. Think rosemary and black pepper, Herbes de Provence, and more.

What to Eat with Breadsticks
A better question might be, what should you not eat with breadsticks? Because honestly, these are so good, I would serve them at every meal if I could. Check out these recipes for some inspiration!
- Sauce: You can’t go wrong serving these breadsticks with homemade sauces for dipping, like my easy marinara sauce, best alfredo sauce, or even pesto! Served with a dip, they quickly become the perfect appetizer!
- Pasta: Go with everyone’s favorite spaghetti puttanesca, or try something a little different like this comforting million dollar spaghetti! If you prefer pastas in a white sauce with a little spice, try this cajun chicken alfredo!
- Salad: Savor the contrast of hot, fresh bread and cool, crisp salad with this copycat maggiano’s chopped salad. You will crave this recipe, believe me! It’s easy to make and loaded with flavorful goodies.
- Soup: Weather you are feeling a bowl of copycat panera tomato soup or chicken gnocchi soup, these breadsticks will be the perfect accompaniment.

Storing and Reheating Breadsticks
To store any leftover breadsticks, just place them in an airtight container or zip-top bag, and store at room temperature for up to 2 days. You can also store them in the refrigerator for up to 1 week.
To reheat, I recommend warming them in the oven at 350°F, but you could also microwave them for a few seconds until just warmed.
Do Breadsticks Freeze Well?
Absolutely! Cool completely and then freeze in a freezer bag or container for up to 2 months. Before serving, warm them up in the oven at 350°F until heated through.
More Homemade Bread Recipes
- Soft Dinner Rolls
- Dinner Potato Rolls
- Garlic and Herb Homemade Croutons
- Buttery Beer Bread
- Texas Roadhouse Rolls
Homemade Breadsticks
Ingredients
For the Breadsticks
- ¾ cup warm water
- 2 teaspoons active dry yeast
- 1 teaspoon granulated sugar
- 2 tablespoons olive oil
- 1 cup all purpose flour
- 1 cup bread flour
- 1 ½ teaspoon salt
For the Topping
- ¼ cup melted butter
- 1 teaspoon garlic powder
- ½ teaspoon Italian seasoning
- ¼ teaspoon salt
- Finely grated parmesan cheese, to taste
Want to save this recipe?
Instructions
- In the bowl of a stand mixer, combine the water, yeast and sugar. Let stand for 5 minutes to proof.
- Once frothy, add the olive oil and whisk. Next, add the flours and salt. Use a dough hook to knead the dough. Once the dough has come together, continue kneading for 6 minutes. The dough will be very sticky at this point.
- Roll into a ball and place into a greased bowl. Cover with a damp towel and set in a warm spot to rise for 1 hour or until doubled in size.
- Once the dough has risen, turn it out onto a floured surface. Cut the ball into 12 slices like pizza. Roll each slice into a rope about 10” long. Repeat with the remaining slices. Place each the sticks onto a parchment lined baking sheet leaving a half inch of space between them.
- Preheat the oven to 400°F. Let the breadsticks rise while the oven is preheating for about 10 minutes.
- Bake breadsticks for 15-18 minutes or until golden. Remove from the oven.
- While the breadsticks are baking, mix up the topping. Add the butter, garlic powder, Italian seasoning and salt to a small bowl and whisk to combine.
- Once the breadsticks have been baked, brush the butter mixture over each warm breadstick and then sprinkle parmesan over the top and serve. Serve immediately.
⭐️ Tried this recipe? Leave a comment and rating! It only takes a minute and helps support our family-run blog. ❤️
Notes
Nutrition
Categories:
Post may contain affiliate links. Read my disclosure policy.
