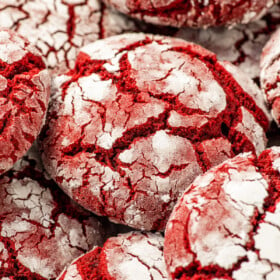
Red Velvet Whoopie Pies

Prep Time 20 minutes
Cook Time 10 minutes
Cool Time 15 minutes
Total Time 45 minutes
Post may contain affiliate links. Read my disclosure policy.

Red Velvet Whoopie Pies are not just a treat for your taste buds but a feast for your eyes, perfect for any celebration. These fluffy whoopie pies feature a soft, cake-style red velvet cookie sandwiched around a tangy cream cheese filling that melts in your mouth!

Why You’ll Love This Recipe

If you’re anything like me, you adore the classic combination of rich, red velvet cake and luscious cream cheese frosting. Red Velvet Whoopie Pies are a delightful twist on this beloved dessert, and I’m thrilled to share my recipe with you. Here’s why I know you will enjoy them too:

  • Incredible Flavor: Rich cocoa powder and tangy buttermilk combine to deliver the quintessential red velvet taste that will leave your taste buds singing.
  • Soft & Moist: These red velvet whoopie pies boast a moist, tender crumb with a soft and fluffy cream cheese filling. They truly melt in your mouth, making each bite delightful!
  • Perfect for Holidays: Roll the edges in colorful sprinkles for different holidays. Blue for July 4th, pink for Valentine’s Day or green for Christmas!
  • Quick: These cute little sandwich cookies are ready in about 45 minutes, including cooling time!

Love making whoopie pies? Me too! Try my pumpkin whoopie pies with a maple cream cheese filling, soft carrot cake whoopie pies, or these easy Christmas whoopie pies!

What You Will Need

Red food coloring masks the cocoa powder’s brown color to give these red velvet whoopie pies their signature deep red color. Scroll down to the recipe card for exact amounts.

For the Red Velvet Whoopie Pies

  • Flour: I always use all-purpose flour, avoid cake flour because it will make the whoopie pies crumbly.
  • Unsweetened Cocoa Powder: Dutch or natural cocoa powder will both work!
  • Baking Soda: Push it through a sieve if it has any lumps.
  • Salt
  • Butter: Skip the salt in the rest of the whoopie pie recipe if you use salted butter.
  • Brown Sugar: Feel free to use light brown or dark brown sugar.
  • Egg
  • Vanilla Extract: You can also use almond extract, but they will no longer taste like traditional red velvet.
  • Buttermilk: I highly recommend using real buttermilk for the best flavor, but you can make your own by whisking 1/2 tablespoon white vinegar into 1/2 cup whole milk.
  • Red Food Coloring: I prefer liquid food coloring, because it dissolves more easily than pastes and powders, or gel food coloring for the most concentrated color.

For the Cream Cheese Filling

  • Powdered Sugar: This is also called “confectioners’ sugar”. Don’t use granulated sugar because it’ll make the filling grainy.
  • Unsalted Butter
  • Cream Cheese: Full-fat cream cheese whips into a creamier, fluffier texture.
  • Vanilla Extract: You can leave it out, but it helps round out the flavors.
  • Salt: I always add a pinch of salt to my frostings to balance the sweet!
Grabbing a soft red velvet whoopie pie with a sweet and tangy creamy cheese filling in the center.

How to Make This Red Velvet Whoopie Pies Recipe

This whoopie pie recipe is so simple with just 3 main steps: making the cookies and a batch of cream cheese buttercream, then sandwiching them together. Below is a quick recipe overview, but please scroll to the recipe card at the bottom of this post for full instructions and to watch the step by step video!

  • Mix the Dry Ingredients: Combine the dry ingredients (except brown sugar) in a bowl. Mix well and set it aside.
  • Beat the Butter: Add the butter and brown sugar to a large bowl. Beat them until light and fluffy. Mix in the egg and vanilla extract.
  • Combine: Add the dry ingredients and buttermilk into the egg mixture. Stir in the food coloring until everything’s good and red.
  • Scoop and Bake: Scoop batter onto the baking sheets with parchment paper, leaving 1″ space between for spreading. Bake in oven, until the tops are set. Remove them from the oven and let them cool completely before frosting.
  • Make the Filling: Beat the butter in a large bowl. Add the cream cheese. Gradually add the powdered sugar and vanilla extract. Beating to combine until smooth and fluffy.
  • Sandwich Together: Pipe the filling onto half of the cookies. Place the remaining cookies on top to create the whoopie pies. Enjoy!

Chef’s Tips and Variations

  • Make Hearts: Once you make the scoops, flatten them out gently and use a toothpick to create a dent towards the center of each one to create a heart shape. Bake as usual.
  • Grease the Scoop: Spray your cookie scoop with cooking spray or non-stick spray to keep the batter from sticking.
  • Add More Chocolate: I like to roll the edges of the Whoopie Pies filling in mini chocolate chips or you can use this chocolate buttercream frosting for the filling!
  • Make them Festive: You can use different food colorings for different occasions: red and green for Christmas, pink and green for Easter Day, or orange and yellow for Thanksgiving. You can also roll the edges in different colored, festive sprinkles!
A bite taken out of a soft red velvet whoopie pie with cream cheese filling.
Landscape photo of red velvet whoopie pies.
4.8 from 4 votes
Print Pin Recipe
Yield: 16 whoopie pies

Red Velvet Whoopie Pies

⭐️Test Kitchen Approved!⭐️
Red Velvet Whoopie Pies with a cake-style red velvet cookie sandwiched around a fluffy & tangy cream cheese filling that melts in your mouth! Perfect for parties or holidays, you can easily dress them up with festive sprinkles or different food colorings!
Prep Time20 minutes
Cook Time10 minutes
Cool Time15 minutes
Total Time45 minutes

Ingredients

For the Whoopie Pies:

  • 2 cups all-purpose flour
  • 2 tablespoon unsweetened cocoa powder
  • ยฝ teaspoon baking soda
  • ยผ teaspoon salt
  • ยฝ cup butter, softened
  • 1 cup packed brown sugar
  • 1 large egg
  • 1 teaspoon vanilla
  • ยฝ cup buttermilk
  • 2 tablespoons red food coloring

For the Filling:

  • 3 cups powdered sugar
  • ยฝ cup (1 stick) unsalted butter, softened
  • 1 (8 oz) block cream cheese, softened
  • 1 teaspoon vanilla

Want to save this recipe?

We’ll email this recipe to you, so you can come back to it later!

Instructions 

Red Velvet Whoopie Pies:

  • Preheat oven to 375ยฐF. Line baking sheets with parchment, or silicone baking mats, and set aside. In medium bowl, whisk to combine the flour, cocoa powder, baking soda, and salt. Set aside.
  • In large mixing bowl with a hand mixer, beat the butter on medium to high speed for 30 seconds. Beat in the brown sugar until light and fluffy. Beat in egg and vanilla. Alternately add flour mixture and buttermilk, beating after each addition just until batter is just combined. Stir in food coloring.
  • Use a medium cookie scoop (about 2 tablespoons of dough) and place batter in 2-inch diameter rounds onto prepared baking sheets, leaving about an inch in between for spreading.
  • Bake 9 to 11 minutes, or until the tops are set. Cool completely on a cooling rack before filling.

Cream Cheese Filling:

  • In a bowl with a hand mixer, beat the butter until smooth with no visible lumps. Add the cream cheese and beat until well combined. Add the powdered sugar and vanilla and beat until smooth and fluffy. Be careful not to over beat the filling!
  • Pipe filling onto half of the whoopie pies and then sandwich together with the unfilled halves. Enjoy!

Video

Notes

Storage: Store them in an airtight container for up to 7 days. Set them on the counter to let them come down to room temperature before digging in.
Freeze: Wrap each individual whoopie pies with plastic wrap and then place in a freezer friendly storage bag. Freeze for up to 3 months. Thaw at room temperature, for about 1 hour, before serving.
Buttermilk: I highly recommend using real buttermilk for the best flavor, but you can make your own by whisking 1/2 tablespoon white vinegar into 1/2 cup whole milk.
Make Hearts: Once you make the scoops, flatten them out gently and use a toothpick to create a dent towards the center of each one to create a heart shape. Bake as usual.
Grease the Scoop: Spray your cookie scoop with cooking spray or non-stick spray to keep the batter from sticking.
Add More Chocolate: I like to roll the edges of the Whoopie Pies filling in mini chocolate chips or you can use this chocolate buttercream frosting for the filling!
Make them Festive:You can use different food colorings for different occasions: red and green for Christmas, pink and green for Easter Day, or orange and yellow for Thanksgiving. You can also roll the edges in different colored, festive sprinkles!

Nutrition

Serving: 1 whoopie pie, Calories: 362kcal, Carbohydrates: 49g, Protein: 3g, Fat: 17g, Saturated Fat: 11g, Polyunsaturated Fat: 1g, Monounsaturated Fat: 5g, Trans Fat: 0.5g, Cholesterol: 58mg, Sodium: 179mg, Potassium: 82mg, Fiber: 1g, Sugar: 36g, Vitamin A: 582IU, Calcium: 42mg, Iron: 1mg

Categories:

Post may contain affiliate links. Read my disclosure policy.

Related Posts

Comments

We LOVE hearing from you! Submit your question or comment here and don’t forget to leave a rating! Click the icon below to upload a pic of your creation!

Recipe Rating:


22 Comments
Newest
Oldest Most Voted
Inline Feedbacks
View all comments

Hey Jessica. The pack says demerara sugar. So i’m guessing it is regular brown sugar.
btw! I am a major fan of urs! Do u have a youtube channel?

The brown sugar that I have is granulated. Will it melt during the whisking or cooking process? It is pretty chunky.

I would love to find these on a dessert buffet.

I guess I better give the recipe a go.

Matthew ๐Ÿ™‚

These look divine! And yes, I agree, I think you’re addicted!

I love baking red velvet cupcakes so I must try this.

Please follow my blog to find delicious recipes also!

Those look to PRETTY and DELICIOUS!

Sexy, sinful and scrumptious!

Wow, these look amazing and are making my mouth water!

They loook awesome. Red velvet with cream cheese frosting is my FAVORITE! Stop tempting me! =)

You know I have never made a whoopie pie and as far as I know, I have never eaten one either. Wishin I could reach through the screen and grab one of yours though…they look phenomenal!

These look so fluffy and soft, and I can’t resist anything with cream cheese icing. I’m definitely going to have to make these.

Oh…YUM! Can I come over and have some? Please?

These are absolutely gorgeous!

These look delicious – great shots. I’ve heard so much about whoopie pies but have yet to make it. Clearly I’ve been missing out!

YUMMY! I just know you are making EXTRA FROSTING Whoppie pies for me!!!! On Saturday! BTW, we will be sitting out by my new fire pit enjoying the cold front that is blowing in tomorrow so you might want to also bring marshmellows!!!!! Love ya.

My my my, these look so….sexy!!!! I want one of these, I have been macarons for a while, and maybe it’s time to move on to these whoopie pies!

Goodness gracious – these babies could not look more perfect and now you have me craving red velvet cake. YUM!!!

Yummy! And I know I am southern and supposed to love red velvet cake and I do…but I think I am going to make these for a GT tailgate and try making them be “yellow velvet whoopie pies” I wonder how it will turn out…

Shucks. I saw “ass-friendly” and got all excited there for a second, until I saw the “-un”, haha! Oh well, we all need a little indulgence, and I would HAPPILY indulge in two or three of these cute whoopie pies… yummy! Thanks for sharing, Jessica!

I wish I knew how you got your whoopie pie cakes to bake up so perfectly. Mine were very round and weeble like. Still tasted good by my whoopie pies were very wobbly.

Thank You For Being Here!

Jessica
For the past 15 years, Jorge & Jessica have loved getting to share their families' favorite recipes with all of you. They live in Florida with their 3 kids.