
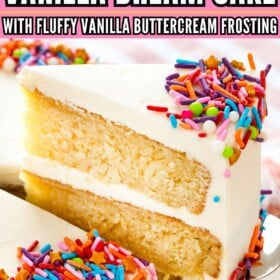

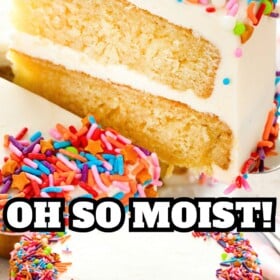
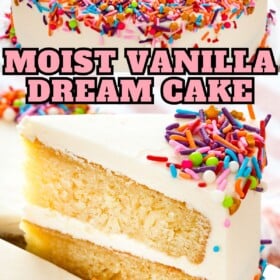
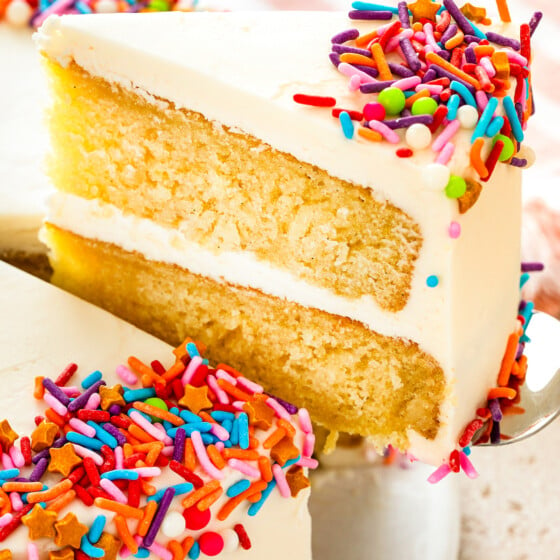
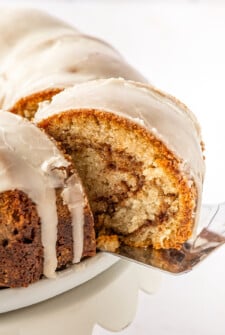
This homemade vanilla cake with fluffy vanilla buttercream and colorful sprinkles is the perfect layered cake for every occasion. So soft and decadent, this moist vanilla cake recipe will take your guests to a vanilla-flavored cloud 9!

Why I Love This Homemade Vanilla Cake From Scratch
This simple vanilla cake is a family-friendly dessert that makes a perfect birthday cake! However, you can easily make it match any occasion with different filings, icing colors and festive decorations. For example, last year I used some food coloring to make the icing orange and decorated the top with black and purple sprinkles for the cutest Halloween cake! When a homemade cake recipe is this good, you’ll find excuses to make it for any celebration. Check out why I’m so smitten with this vanilla cake recipe:
- Double Vanilla: With vanilla extract and a vanilla bean, this cake is full of real vanilla flavor!
- So Moist: This is a dense cake, made with 2 cups of water (or milk) to give it that perfect soft and moist crumb texture.
- Beginner-Friendly: You can make the batter easily by hand with just a whisk and a bowl!
- Party Ready: Everyone loves a homemade vanilla cake with fluffy vanilla buttercream and colorful sprinkles. It’s a well-loved classic for good reason!
- Make It Your Own: This cake is a great base to dress up with different fruit fillings, icing flavors, fun extracts and citrus zests!
Love making stunning layered cakes? Me too! Try my favorite best banana cake, decadent chocolate peanut butter cake, impressive pumpkin cake or this double chocolate cake!

Key Ingredients
A potent vanilla bean is what sets this cake apart! Scroll down to the recipe card below for the full ingredient list and exact amounts!
- All-Purpose Flour: Feel free to use cake flour. When measuring, spoon the flour into a measuring cup (instead of dunking the cup in the bag) to avoid packing your flour.
- Leavening Agents: You will need both baking powder and baking soda.
- Water: You can swap it for milk if you want a creamier cake.
- Granulated Sugar: Light brown sugar can be used instead, but will darken the color of your cake.
- Vanilla Extract: Use your favorite kind. Personally, I try to only use pure vanilla extract for this cake recipe because it’s the most prominent flavor.
- Vanilla Bean: This adds lovely aroma and sweetness. A tablespoon of vanilla bean paste also works!
- Vanilla Extract: If color is important to you, using a clear vanilla extract will keep the frosting white.
- Heavy Cream: You can use half-and-half or whole milk instead.

How to Make Vanilla Cake From Scratch
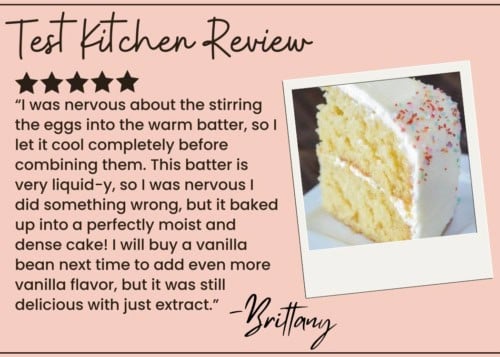
Don’t over-mix the batter and make sure to let the liquid mixture cool slightly before adding the eggs. Below is a quick recipe overview, but please scroll to the recipe card at the bottom of this post for full instructions.


- Prep: Preheat oven to 350°F. Butter two 8-inch round cake pans.
- Dry Ingredients: Whisk all the dry ingredients in a bowl. Set aside.
- Wet Ingredients: Simmer the water and sugar in a pot over medium-high heat. Remove it from the heat and add the butter. Chill the mixture in the fridge.
- Combine: Mix the oil, extract, and vanilla bean into the chilled sugar-butter mixture. Beat in the eggs and then whisk in the dry ingredients until smooth.
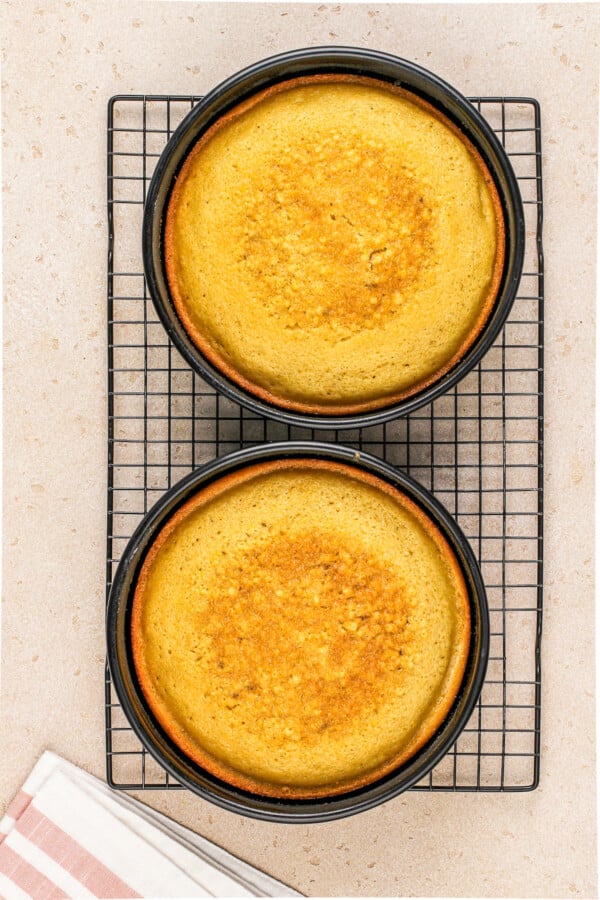
- Bake: Divide the cake batter evenly between the cake pans and bake until a toothpick inserted in the center comes out clean. Remove them from the oven and let cool on a cooling rack before frosting.
- Buttercream: Beat the butter until light and fluffy. Add in the powdered sugar 1 cup at a time. Add the vanilla extract, salt and 2 tablespoons heavy cream. Beat until smooth and fluffy.
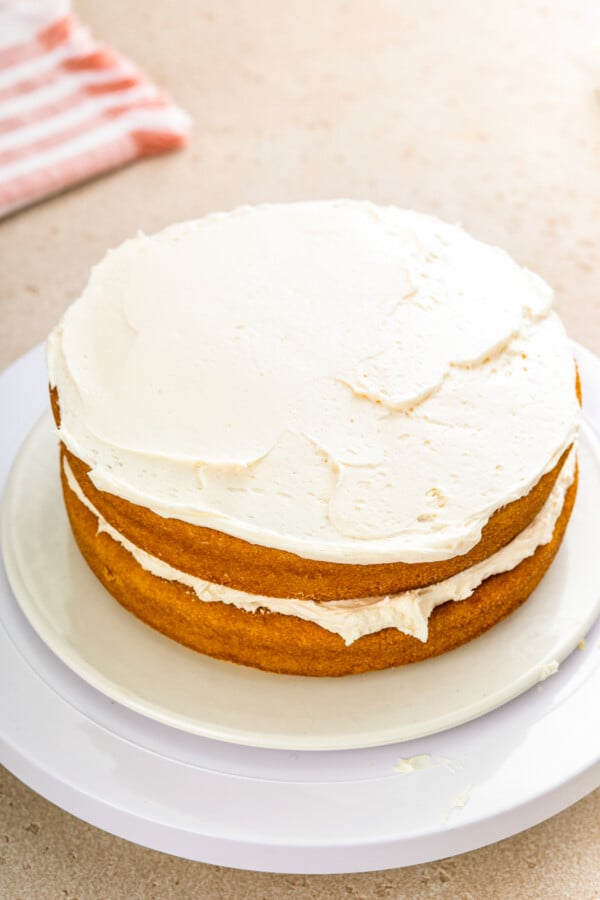
- Assemble: Layer the cooled cakes with a thick layer of frosting in between. Apply a thin crumb-coat. Chill the cake. Add a final, thick layer of frosting, decorate and serve!

Chef’s Tips
- Cool before frosting: Let the cake layers cool completely before decorating, otherwise, the icing will melt. The cake layers can be made a day or two before adding the frosting to save you time on the day of!
- Make ahead: Wait for the cake to cool completely before wrapping them tightly in plastic wrap. Store them in the fridge for up to 3 days, or freeze for up to 3 months. When you’re ready to make the cake, all you have to do is stack, frost and serve!
- Cover the cake: If the tops and edges of the cakes brown too much before the baking time is up, lightly cover them with foil. This will stop them from browning much more.
- Prep your pan: If you’re worried about your cake sticking, flour the edges of each pan after you’ve buttered them. You can also add a circle of parchment paper to the bottom to guarantee your cake will not stick!
- Ensure even baking: These cake pan strips wrapped around your cake pans make the biggest difference for a perfectly evenly baked cake! If you use these, you should not have to level your cake!
- Add a crumb coat: A crumb coat is a very thin layer of frosting used to “glue” crumbs down. This prevents any crumbs from coming loose and making your icing lumpy. Apply a thin crumb layer on the top and sides of your cake and then chill cake in the fridge until frosting is firm. Then frost with the final thick layer of frosting.


Vanilla Cake Recipe Variations
- Fillings: Pipe a thick buttercream edge along the bottom cake layer but leave the center empty. Spoon in your filling of choice and stack the cakes and decorate as usual. Here are some fun options: homemade Nutella, dulce de leche or lemon curd.
- Icings: Decorate the cake with my chocolate buttercream or your favorite cream cheese frosting for an easy variation.
- Almond: Keep the vanilla bean if you want, but swap the vanilla extract for almond extract for a moist almond layer cake! For a raspberry almond cake, fill the center of the cake with fresh raspberries and a thick layer of raspberry jam.
- Chocolate Chip: Add 1 cup chocolate chips to the batter and frost with either chocolate or vanilla buttercream frosting. Instead of rainbow sprinkles, decorate the cake with mini chocolate chips.
- Citrus: For a citrus flavored cake, swap the vanilla bean for 2 tablespoons fresh citrus zest. For even more citrus flavor, you can swap 1/2 cup of the water for orange, lemon or lime juice.

Vanilla Cake
Ingredients
Vanilla Dream Cake
- 2 ¼ cups all-purpose flour
- 2 teaspoons baking powder
- 2 teaspoons baking soda
- ½ teaspoon salt
- 2 cups water
- 2 cups granulated sugar
- 6 tablespoons unsalted butter
- 2 tablespoons vegetable oil
- 1 tablespoon vanilla extract
- 1 vanilla bean, scraped, or 1 tablespoon vanilla bean paste
- 2 large eggs
Vanilla Buttercream
- 1 cup (2 sticks) unsalted butter, room temperature
- 4 cups powdered sugar
- 1 tablespoon vanilla extract
- 2 to 3 tablespoons heavy cream, half and half, or milk
For Decoration (Optional)
- ½ cup rainbow sprinkles
Want to save this recipe?
Instructions
Vanilla Cake
- Preheat oven to 350°F. Butter two 8-inch round cake pans. Set aside.
- In a medium bowl, whisk together flour, baking powder, baking soda and salt. Set aside.
- In a medium saucepan over medium high heat, combine water and sugar. Bring to a simmer and stir until sugar dissolves, about 1 minute. Remove from heat and add butter, stirring until melted. Chill the butter mixture in the fridge for about 20 minutes, until no longer warm to the touch.
- Once chilled, whisk in vegetable oil, vanilla extract and the scrapings from the vanilla bean into the butter mixture. Beat in the eggs. Whisk in the dry ingredients, until smooth.
- Divide batter evenly between prepared pans and bake for 25 to 30 minutes, or until a toothpick inserted in the center comes out clean.
- Let cakes cool in pans completely until cool to the touch, then frost as desired.
Vanilla Buttercream
- In a stand mixer with the paddle attachment, cream the butter until light and fluffy. Add in the powdered sugar 1 cup at a time, mixing thoroughly after each addition.
- Increase speed to medium and add vanilla extract. Add 2 tablespoons of heavy cream and beat for 3 minutes. If your frosting is too thick, add remaining 1 tablespoon of cream.
Assemble
- Assemble the 2 layers with a thick layer of frosting in between.
- Optional Crumb Coat: Apply a thin crumb coat (very thin layer of frosting meant to catch any crumbs) on the top and sides of the cake. Pop the cake into the freezer to harden the crumb coat for about 10 minutes.
- Apply one final thick and even layer of frosting around the outside of the cake, decorate, and serve.
⭐️ Tried this recipe? Leave a comment and rating! It only takes a minute and helps support our family-run blog. ❤️
Notes
 Learn more about our Test Kitchen promise!
Nutrition
Categories:
More Cake Recipes To Try

Post may contain affiliate links. Read my disclosure policy.

I make this recipe all the time. So good!
Could I add sprinkles to the batter for funfetti or is it too thin to hold them throughout? This looks amazing. I have been looking for a vanilla cake recipe with water as the chocolate one I have with water always comes out perfect but I never could figure out what to exchange the cocoa for.
I use cake flour as opposed to all purpose flour. Would I still use the same amount of flour that you use with all purpose?
Never mind. I think I found a good ratio. I used 2 1/4 cups cake flour PLUS an additional 8 tablespoons. Baked at 375 for 14 minutes – WOW! What a flavor! Yes, the batter was still very soupy, and I was very skeptic, but they turned out great. Going to let them cool, and see if the fluffy moist consistency stays. Also have another batch in the oven going for 20 minutes on 350. Will update with what my final outcome is. As of now though, great recipe!
350 for 20 minutes seems the better option. At 375 I got the volcano effect that others mentioned. At 350 I got perfectly rounded tops. Going to see how they hold up in the moist department overnight. BUT, I will say this – While these are good, they have a very similar flavor and mouth feel to that of cornbread.
I feel like I’ve taken over this post….
After sitting over night, the cupcakes definitely firmed up, and got a little dense – Just a little. They retained their moistness though.
The very noticeable thing about these is that they definitely smell like vanilla – In fact, they’re almost a little too strong in the scent department. I dare say you could leave a dozen out in your house in lieu of an air freshener.
In handing out a dozen around the office, everyone commented how good they were – Which is the most important thing out of all of this. If they don’t taste good, it doesn’t matter what they smell like.
This recipe is definitely going into my rotation. The one thing I’m considering is adding half a cup of vanilla pudding in place of 1/2 a cup of flour. Perhaps this will help them stay light and fluffy.
Wondering what kind of texture is the cake supposed to have? Dense or light and fluffy? Most cakes with all purpose flour tend to be a bit more dense. Thanks.
Hello Jessica, Kathy Pollack from Noble Pig blog, posted your beautiful cake today. I live in England so I need to know if the all purpose flour you were using was bleached flour or unbleached flour. ( we don’t have any bleached flour here…banned in 1997. I have ways around it though.)
I can see this is quite the controversial cake from the comments ( Let the criticism roll off your back.. No one has paid to get your recipe!) I am willing to gamble a few ingredients to see if I can recreate the dream cake. I admire your curiosity and tenacity to experiment with cake baking. Consider yourself a baking explorer!
Is the batter supposed to be runny and soupy? I followed the recipe to a T and it came out badly. Hopefully, you’re able to answer my question.
Very disappointed with this recipe. It is not at all fluffy as shown but sad and heavy. I followed the recipe exactly but did bake for another ten minutes. The batter was very thin. I have made chocolate cake this way and it was very good but I don’t think we can even eat this one.
How would I make this cake with srf please? I have been dying to find a fluffy moist white cake as beautiful as this and I believe that I just found it!
Eating this cake as I write this review. It really is quite dreamy, with a wonderful vanilla flavour and moist texture. I have a new go-to vanilla layer cake!
A few things to keep in mind. The batter is quite runny – don’t be put off or add extra flour. I found it hard to get the cakes out of the pans (I buttered and floured). Using an icing spatula helped me to successfully lift the cakes out of the pans. I also found it strange that the cake didn’t rise evenly, despite rotating the pans. This has never happened before in my oven. These are small issues and they would not deter me from making this cake again. Once baked, the cake speaks for itself.
Hi! I want to make this cake but I would like to know if I can substitute the all purpose flour with cake flour? And if so what are the proper measurements for the cake flour and the baking soda and baking powder to the cake flour measurements? Also how much vanilla extract should we use if we do not have vanilla beans? Thank you!
Is the batter suppose to be soupy?
My cake didn’t turn out right.. I followed it to the T .. It tasted weird
Hi, Iam so happy to find your post, Iam loving your recipe and I haven’t try it. How sweet is this cake?
I have to do a Tres Leches Cake ( 3 milks cake ) or wet cake, do you think that if I cut the sugar to 1 1/2 cups on the cake will afecct the flavor? Tres Leches Milk is sweet and I do not want a super sweet cake. What do you recommend?
One more comment I think is important to make that I forgot to mention is definately use parchment to line your pan with. I did notice the cake doesn’t completely separate from the pan when nearly cooled down. I sprayed a metal pan with cooking butter spray and the bottom only stuck to the pan. I was not looking this time for aesthetic appeal, so I just put the cake back into the pan and frosted the top only. The top only was definitely enough to frost using the frosting recipe that’s given to go with the cake. Sweetness is personal likeness, and Jessica does say she loves lots of sweetness 🙂 Also my website was incorrect in my first comment. If you click on my name now in this comment you will find my family homeschool website now, hopefully 😉 The website is under construction, but if you are patient, I should have much content added to the website over time to look at, and I hope what I post will be found useful to anyone who homeschools or is thinking of homeschooling 🙂
Awesome cake! I almost did not dare comment on my results due to the negative feedback being given, namely the comment that if I loved this recipe I was then a liar and a friend of the baker making false positive comments about this recipe. I assure you I am a complete stranger to all here, including the baker. Anyway, I did a one layer 9×12 pan Birthday Cake for my husband. The kids even helped out. I gave the cake 10 extra minutes since the pan I used was larger and hence needed more baking time. I think I will make this again using next time cornstarch. Does anyone know what ingredient should be omitted if I use cornstarch? I normally use pudding in my cake recipes for moistness and believe me the results are always a moist cake. If you thought this cake smells and even tasted eggy, then completely cool the sugar water first, and try to add a few Tablespoons of premade Vanilla pudding to your mixture as one resolve to any lack of flavor you thought the recipe had. There are actually so many different ways to alter this recipe to your liking. The only thing you probably won’t be able to most of all alter is the heaviness of the cake. I loved this recipe, and it has become one of my favorite keepers as far as making the basic recipe, but making a few changes to it every time I go to make it, until I find the changes I prefer to make to this recipe that will eventually put my personal mark on it. I think the best kind of bakers out there would not so quickly discard this recipe, and I encourage novices to experiment with this recipe as well. I have never used water before in a cake recipe, but it works..water evaporates during cooking, and this technique of using water really does make this cake very moist as an end result. I used food coloring for the frosting adding 3 drops of red and 3 drops of blue to make a purple color frosting since my husbands favorite color is purple. The cake was so good. If anything the frosting was just too sweet and my husband and I agreed the cake was delicious without needing such a sweet frosting. We both thought whipped topping and fruit would be a great topping for this heavy moist cake. I Again this cake is delicious without any topping at all, and served with coffee or tea any time of the day, and to make for any kind of event. The cake recipe without the frosting gets 5 stars in my recipe book!
It must be a matter of taste. My daughter and I think it is gross, but my husband and son are gobbling it up. I will be baking another cake because this week one was supposed to be for my daughter’s birthday. Oh ours looked like a brain in the miidle too.
So Sorry, Every Sunday I make a cake this Sunday I wanted vanilla,I found this recipe after 3 hours of research,I have all the ingredients and this was different. This cake tastes like cornbread and smells like egg,I will never use a recipe off of this site again.
Didn’t work for me either 🙁
Cake looked and smelled amazing but when I cut it wasn’t baked through even though the stick came out clean.
Instead of using 8 inch pans could I just use a 9×12 pan?
This cake is amazing… however, I just “buttered the cake pans” as it stated and cooled the cake in the pans as it said, but when I went to pop them out… they stuck horribly. I should have listened to my inner voice saying “parchment paper your pans!!!” Ugh.