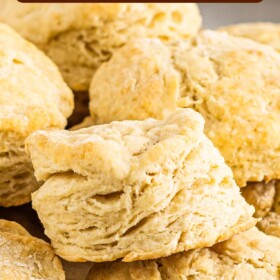

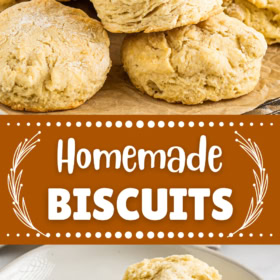


These fluffy, buttery homemade biscuits are the best I’ve ever had! This easy recipe uses baking powder and buttermilk for the richest, tenderest biscuits that are perfect with any meal.

Why I Love These Homemade Biscuits
There’s nothing quite like a fresh, warm, made-from-scratch biscuit with your meal, whether it’s sopping up sausage gravy or enjoyed for “dessert” with honey, syrup, or chia cherry jam. Buttery, flaky, soft, and tender, a good biscuit is a real treat, and these homemade biscuits are the best! Making biscuits is way easier than you think, too. Here’s why this recipe is my go-to:
- Easy. This recipe will show you how to make biscuits from scratch, using basic pantry staples and a few easy techniques. The result? Mouthwatering biscuits that everyone will rave over!
- Full of flavor. These are buttermilk biscuits (the best kind if you ask me) and they’re deliciously soft, with a little tanginess to balance out the buttery flavors. So good.
- Tender and fluffy. These biscuits are so tender, fluffy, and melt-in-your-mouth. They bake up golden outside and soft and steamy inside, ready to be spread with butter or jam.

Key Ingredients
The ingredients for homemade biscuits are mostly pantry staples, plus buttermilk! Check out my notes on the ingredients here, and scroll down to the recipe card after the post for a printable list with the full recipe amounts.
- Flour: For this recipe, I recommend using plain all-purpose flour. Or, for an even softer biscuit dough, you can substitute pastry flour instead. I do not recommend using whole wheat flour, spelt, or other specialty flour. Keep it simple, sunshine!
- Baking Powder, Baking Soda, and Salt: For a good rise, it’s important to use fresh baking powder and soda, and the right amount of each. I always recommend checking the dates on your rising agents to make sure they are fresh and effective!
- Butter: Make sure the butter is good and cold, right out of the fridge, for the best biscuits. Cut it into cubes.
- Buttermilk: Don’t have buttermilk? No problem! Measure 2 tablespoons plus 1 ½ teaspoons of vinegar into a measuring cup, and pour in enough milk to make 1 ¼ cups total. Let this sit for a few minutes, and you’ve got a great homemade buttermilk substitute! You can use the leftovers in more baking recipes like blueberry buttermilk bread and Johnny cakes.
What Does Buttermilk Do in Biscuits?
Buttermilk is a special ingredient in biscuits for two reasons. First, it helps the biscuits to rise by reacting with the baking soda to make things bubbly and light. Second, buttermilk adds a subtle, tangy flavor and some richness to the biscuit dough. (It’s also an excuse to buy buttermilk, which is tasty on its own with cornbread and other snacks.)

How to Make Homemade Biscuits
Now for the fun part! Rolling and cutting the biscuit dough is so easy and satisfying. It’s a great project to have the kids help with, too! Pro tip: when kneading the dough, flour your hands to keep the dough from sticking to them. Follow the steps below to make perfect homemade biscuits. You’ll find the printable instructions in the recipe card.
- Prep. To begin, make sure your oven is preheated (to 350°F). That way, when the biscuits are cut you can slide them right into the hot oven. Next, line a baking sheet with parchment paper, and lightly spray it with cooking spray. Set this aside while you work on the dough.


- Combine the dry ingredients. Measure your flour, baking powder, baking soda, and salt into a large mixing bowl. If needed, sift the dry ingredients to break up any lumps.
- Cut in the butter. Give everything a whisk to combine, and drop in the butter cubes. Use a pastry cutter or a fork to cut the butter into the flour, until it reaches a crumbly, breadcrumb consistency.
- Add the buttermilk. Next, stir in the buttermilk to form a wet, sticky dough that is not fully combined at this point.


- Knead the dough. Turn your dough out onto a clean, floured surface, and knead it just until it starts to come together. Afterward, roll the dough (or press it with your hands) into a thick disc, about ¾ of an inch thick.
- Cut out the biscuits. Use a biscuit cutter to cut 12 biscuits from the flattened dough. If you run out of dough, press the scraps together gently, roll again, and cut more biscuits.


- Bake! Carefully place the biscuits onto your baking sheet. Bake at 350ºF for 25 minutes, until the biscuits are puffed up and pale golden brown.
- Enjoy. Serve your homemade biscuits warm from the oven, with your favorite main course (or with butter, honey, jam, a glass of milk… anything!). See below for easy serving ideas.
Make-Ahead
If you want to make your biscuit dough and save the baking for later, you can freeze the unbaked biscuits, and get that right-out-of-the-oven taste anytime. To freeze, prepare and cut out the biscuit dough according to the recipe. Line the biscuits up on a baking sheet, but don’t bake them. Instead, pop the baking sheet in your freezer until the biscuits are frozen solid. Afterward, place the frozen biscuits in a freezer container or freezer bag. Freeze for up to 3 months. Bake directly from frozen, adding a few extra minutes of baking time as needed.
I love having frozen biscuits on hand. If I’m not baking them from frozen, I’ll thaw them in the fridge to use in recipes like my chicken pot pie with biscuits or chicken and dumplings.

Tips for the Best Biscuits
If you’ve ever made a pan of disappointingly heavy, flat, or hard biscuits, you know how frustrating that can be! But no worries – I’ve got all the tips and hacks for great biscuits, with plenty of fluffy layers.
- Use cold ingredients. One of my top tips for the best biscuits? Keep that butter cold. Unlike other recipes where you really need to soften the butter, biscuits bake up better when you use hard, cold pieces of butter. This is because biscuits get some of their rise and flaky layers from the butter melting and creating steam during the baking process.
- Handle with care. It’s essential to use a light touch when you work with biscuit dough. In fact, while you do have to “knead” it a bit, it’s helpful to remember that this is nothing like kneading bread dough. You want the dough to come together into something rollable, it’s true, but don’t go beyond that, or you risk overdeveloping the gluten and making chewy biscuits.
- Use a pastry cutter. While some cooks make great biscuits by breaking up the butter by hand, a pastry cutter is a great tool for this job. It cuts the butter into satisfyingly small pieces, without melting it. If you don’t have one, however, a fork works, too.
- Use a biscuit cutter. Another great tool is a real biscuit cutter or a metal cookie cutter with tall sides. You could also use a glass, but cutting biscuits with a blunt or rounded edge tends to smush the dough. Smushed dough won’t rise as well as sharply cut dough with all those layers and chunks of butter intact. If you’re a fan of baking biscuits, it’s worth it to buy a cutter!

Serving Suggestions
Like good dinner rolls or garlic bread, biscuits go with just about any main course you can imagine. For some people, homemade biscuits are a must-have at every dinner! These are a few tasty recipes that we like with biscuits:
- Chicken: This crockpot Mississippi chicken has plenty of delicious sauce, perfect for serving with biscuits. Also, try this Southern chicken with biscuits for a weeknight dinner the family will crave.
- Ham: Ham and biscuits are a classic combo, and air fryer ham is probably the easiest you’ll ever make! For bonus points, make some beer bacon collard greens on the side, and you’ve got a down-home Southern meal that’s as simple as it is delicious.
- Anything with Gravy: Whether it’s a pot roast, a pan of sausage gravy, smothered cube steak, or this simple Instant Pot turkey and gravy, serve it with biscuits!
- Jam: For a sweet option, enjoy these biscuits warmed up and topped with butter and your favorite jams or preserves. They’re also great drizzled with honey or maple syrup.

Storing and Reheating Biscuits
- At room temperature. These homemade biscuits can be stored in an airtight container or baggie for up to 3 days. It’s best to wait until they’re cooled down before storing them, so they don’t steam up and get gummy inside. I love using leftover biscuits to make mini chicken pot pies!
- Freeze. Let the biscuits cool to room temperature first. Then, wrap each biscuit in plastic wrap or foil. Place the wrapped biscuits in a freezer bag, mark them with the date, and store them for about 3 months. Thaw before reheating.
Easy Homemade Biscuits
Ingredients
- 3 cups all-purpose flour
- 4 teaspoons baking powder
- 1 ½ teaspoons salt
- ¼ teaspoon baking soda
- ½ cup chilled, cubed butter
- 1 ¼ cups cold buttermilk
Want to save this recipe?
Instructions
- Preheat the oven to 350°F. Line a baking sheet with parchment paper, and lightly spray with baking spray. Set aside.
- In a large mixing bowl, whisk to combine the flour, baking powder, salt, and soda. Add the cubed butter, and cut it into the dry ingredients using a fork or pastry cutter.
- Next, add the buttermilk and mix until incorporated. The dough will be wet and sticky.
- Turn out the dough onto a clean, floured surface. Lightly knead until the dough starts to come together. Press or roll into a ¾ inch thick disc. Using a cup or biscuit cutter, cut out 12 biscuits. You may have to re-roll the dough to make all 12.
- Transfer the biscuits onto the prepared baking sheet, and place into the preheated oven. Bake for 25 minutes, or until the biscuits have risen and are fluffy and golden.
- Once baked, remove from the oven and serve warm.
⭐️ Tried this recipe? Leave a comment and rating! It only takes a minute and helps support our family-run blog. ❤️
Notes
- Storage: Biscuits may be stored in an airtight container or baggie for up to 3 days. It’s best to wait until they’re cooled down before storing them, so they don’t steam up and get gummy inside.
- Buttermilk Substitute: If you don’t have buttermilk, you can make your own soured milk by combining vinegar (or lime juice) and regular milk. Measure 2 tablespoons plus 1 ½ teaspoons of vinegar into a measuring cup, and pour in enough milk to make 1 ¼ cups total. Let this mixture stand for 5 minutes to thicken before adding it to the biscuit dough.
- Flour Your Hands: When kneading the dough, flour your hands to keep the dough from sticking to them.
- Pastry Cutter: Using a pastry cutter will ensure that the butter gets cut into the dry ingredients well, resulting in buttery, flaky layers.
Nutrition
Categories:
More of the Best Biscuit Recipes
- Garlic cheddar biscuits are easy to make in just 30 minutes!
- 7-Up biscuits have the best fluffy, light texture.
- Southern buttermilk biscuits are made with both butter and shortening!
Post may contain affiliate links. Read my disclosure policy.
